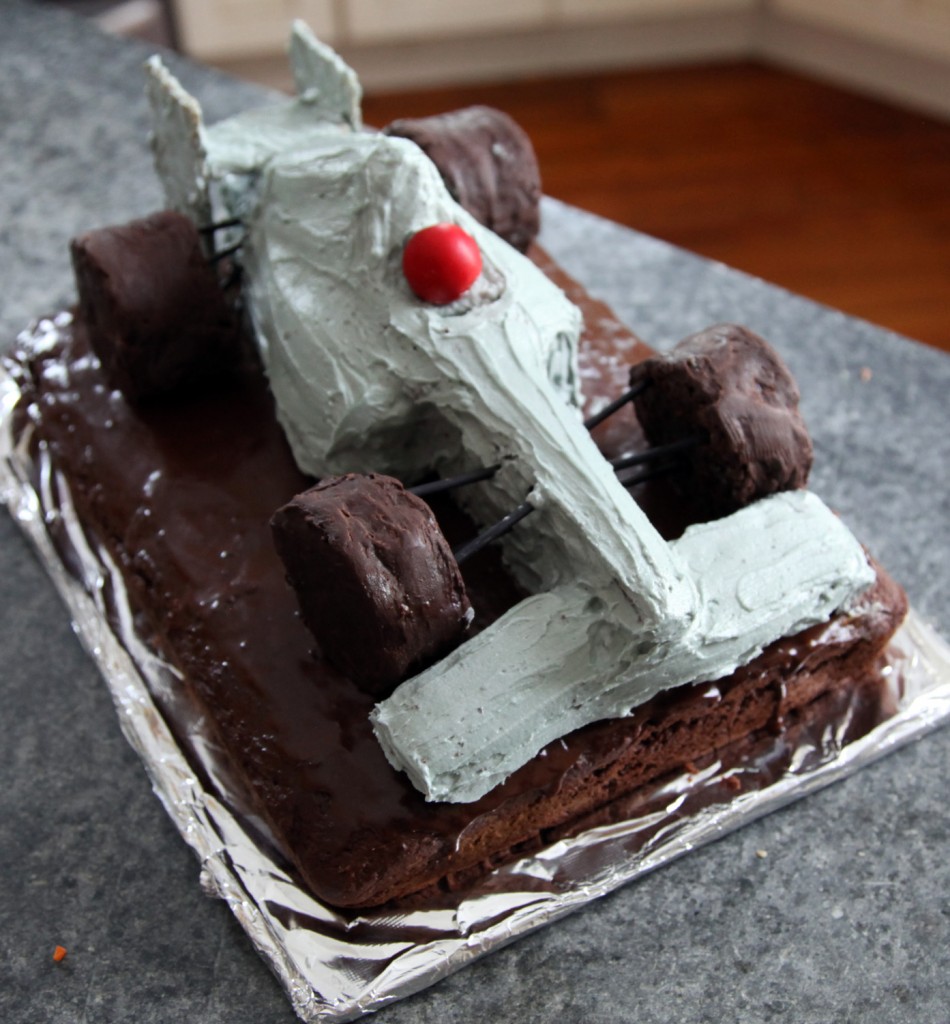
Okay, still a little off topic but I thought I would show you how we put Sam’s F1 Race Car Cake Together. We are not cake experts and are not even normally bakers (although I do like to make the kids’ birthday cakes). Sam requested Jensen Button’s F1 McLaren race car in cake form for his birthday (this from a boy who already has a race car bed). We made him a Mini Cooper cake last year, so the boy has expectations! We looked online and found several photos and instructions. I thought that this youtube video showing the making of a Ferrari F1 cake to be the most helpful. Our rule is that everything (not including toothpicks) needs to be edible. We also prefer the cake to be tasty so homemade frosting trumps stiff plastic fondant or lots of sugared pieces. It took 3 days to finish (lots of cooling and setting in between) and we think it came out great. Not Cake Boss worthy but Sam was happy (which is what counts) and it was very tasty.
Step 1: Bake a firm rectangular cake (we used a 9×13 pan). We used this firm chocolate cake recipe. A second rectangular cake will also be needed later. Cool (we baked ours the night before and put it in the fridge).
Step 2: Making sure the cake is cold, cut the body of the F1 cake (we found an overhead shot of the car to use as a template) and cut the wheels (we used a biscuit cutter but you could use a glass as well). Try to leave as large of pieces as possible for the rest of the cake (including the front wing and the top of the body)
Step 3: Cut and sculpt the second layer of the car body using a knife. If the cake starts getting warm, put it back in the fridge to keep it cool. This is the most difficult step. Keep referring back to the picture. The cockpit is made with 3 small rectangles separate from the back. The front wing is made of 2 triangular pieces.
Step 4: Make frosting. I used a buttercream frosting recipe and added a little bit of black food dye (from Wilton designed for cake frosting). Unfortunately it had a green hue. I added a little red to try and make it more neutral. I also put the frosting in the fridge for a little while to allow it to cool.
Step 5: Put on first layer of frosting (starting with gluing the layers of cake together). This is the crumb coat. It will help minimize the crumbs from the cake showing in the end. I never use to bother with this step, but it made a big difference (especially when you have a dark cake like this with light frosting). Put in fridge to set (we did this overnight).
Step 6: Make Second Cake (if you haven’t already). Make chocolate frosting (I use my mom’s secret recipe which involves butter, unsweetened chocolate, an egg and lots of powdered sugar). Cool both.
Step 7: Frost lower cake with chocolate frosting. Frost wheels with same frosting. We actually tried frosting the wheels with chocolate candy melt. We didn’t have very good luck with this and wouldn’t recommend it.
Step 8: Carefully move the car using large spatulas (we used our grill spatulas). This works best with 2 people (i.e. why we don’t have a photo of this). We put the wings on separately to ease in the move.
Step 9: Carefully frost the car with the second layer of frosting. I used a baby spoon and butter knife.
Step 10: Using toothpicks or bbq skewers make the connections from the car to the wheels (the only non-edible part of the cake). We also painted these black.
Step 11: Carefully attach the wheels to the body. We attached the the toothpicks to the wheels first and then inserted them into the car and carefully placed them on the lower cake. This is also much easier with 2 people.
Step 12: Clean up the frosting.
Step 13: Install wing. We used a butter crisp cookie wafer and frosted it. The two sides sit on the bottom cake and are glued to the middle part with frosting. The middle piece sits on the back of the body of the car.
Step 14: Add gumball for helmut.
Step 15: You could add more details to the car like some red accents. In the end we decided that it was more likely to screw up the cake. Fondant would be the easiest way to do this. Roll thin and trace the pattern and logos from the car and carefully put on the cake.
Step 16: Enjoy! This cake feed 11 of us with lots of extras. I would say this would feed 16-20 people. I highly recommend vanilla ice cream with this dense chocolate cake. mmmm…


