Purple Aster with Amsonia

I hope everyone had a lovely weekend! We had a nice warm day on Sunday, probably one of the last for the season. Unfortunately it is nearing the end of the gardening season here. There isn’t a lot in bloom at the moment and I have run out of steam in the garden.  The garden is looking a little weathered and there is a lot of weeding to do but I thought I would show you the last couple of bright spots in the yard.  I am still in love with the Amsonia in my yard and am always looking for new spots to put it in. It starts out slow in the spring with some blue flowers but it is a show stopper this time of year in a lovely lime green that will fade to yellow as the leaves change. The asters are also in bloom. I have a short purple (exact variety unknown). I keep thinking that I should plant some tall varieties for the back of the bed.

Common Toad Lilies

The toad lilies are looking great (except for the few that got chomped down by the bunnies). The mounds of these plants are really good about expanding. I divided the ones that I bought a couple of years ago before I put them in the garden and now they are huge again. Next year I will probably divide a few of these to spread them out further.

Common Toad Lily Flower

They look so much like orchids, how can you go wrong?

The Shade Garden with one of our pumpkin friends

And of course the garden wouldn’t be complete without some pumpkins. In our case Maisie picked out some pumpkin decorations which decorate the shade garden that we pass on our way to the garage every day.

Leave a comment

New Rug Sneak Peek

October 11, 2012 — Leave a comment

New Rug Sneak Peek

The new rugs arrived yesterday afternoon. I haven’t unrolled them yet, but I did cut open one of the packages to take a little peek. The colors look pretty good (Phew!).  It is always a little daunting to order something like this online without seeing the colors in person. From the portion I have looked at there appears to be a little more purple in my rug than in the picture.  Also the edge is red (which is good since that is one of the main colors that I wanted to pick up).

Now lets see if I can get a little work done in the bedroom so I can put these in place. The thought of a soft wool rug in the bedroom as the weather gets cold is very appealing.

Leave a comment

Master Bedroom: Updated Mood Board

I first started a mood board for our Master Bedroom over a year ago but the project generally went on hold while we tackled the basement, thanks to a super wet fall last year and some moldy walls. Well the bedroom is still a mess and in desperate need of some new storage. We still have some smaller things to take care of, and some air conditioning to think about, but I thought I would give you an update. One item we need for the space is a new rug. We currently have a sisal rug which is okay, but not very soft on the feet. I have been on the search for the perfect rug for over a year now. At first I thought I might go with something light to make the space feel a little brighter, but the realities of that with 2 kids and 2 black cats made me decide against that. I then looked at lots of different patterns and quickly realized I didn’t want a rug with a border. I also wanted one that would pick up on the green and red on the panels. Did I mention that it needed to be 9×12 as well? And cost under $1000 (ideally quite a bit less)? I was beginning to think that I had too many parameters. So when I saw this one on Fab this week I jumped. I decided to go with two 6×9  rugs since they didn’t have a 9×12. Fortunately the stripes run the 9′ direction so we don’t have to match the stripes.

Safavieh Striped Wool Rug

So here is where it gets interesting. The downside to flash sites like Gilt, One Kings Lane, Joss & Main, and Fab are that once you put a product in your “basket” you have somewhere between 10-20 minutes to purchase it or it goes back up for sale and the sale only lasts for a couple of days but often the good items sell out fast. In this case, I had 20 minutes. So in that time I needed to decide was it a good fit, a good price and does Mr. S. like it. My adrenaline kicked in since this is the first rug with good potential in over a year! I was pretty excited (yes, I know I am a geek who clearly needs to find better ways to get a rush).

Fab Sale Page

The first thing I do when I pick out something from one of these sites is search online to see if I can buy it somewhere else for less or with better shipping prices and/or return prices (most flash sites only offer limited returns). This time I searched under the name of the rug on the sale (Kadirli). It is a Safavieh rug (they make a lot of rugs), so in my search I didn’t find anything. The price seemed reasonable, certainly well less then retail ($269 for a 6’x9′ rug). So after Mr. S. gave the okay I decided to place the order. Great! I was a little annoyed at the shipping price (I think it was around $40), so I did a little more searching after my order.

Overstock Rug Page

This time I searched under “Safavieh striped rug” and what turns up, but the same rug on Overstock for less with free shipping. Errrr…. That is what I get for not doing a more full search. So I popped back over to Fab and saw that you have 2 hours to change your mind on most items! Awesome! So I canceled that order, went home and double checked the size I wanted and ordered 2 on Overstock for $234 each for a total of $468. Now I just have to wait for them to get here and renovate the room. I think I might put them in there even before we do the rest of the room.

I have to say that as much I was annoyed that I found it for less somewhere else, there is some great stuff on these flash sites, you just have to do your homework! I have bought quite a bit of stuff from Fab, One Kings Land and Joss & Main and in general I have been quite happy.

Has anyone else regretted a purchase from a flash site? Or scored something amazing?

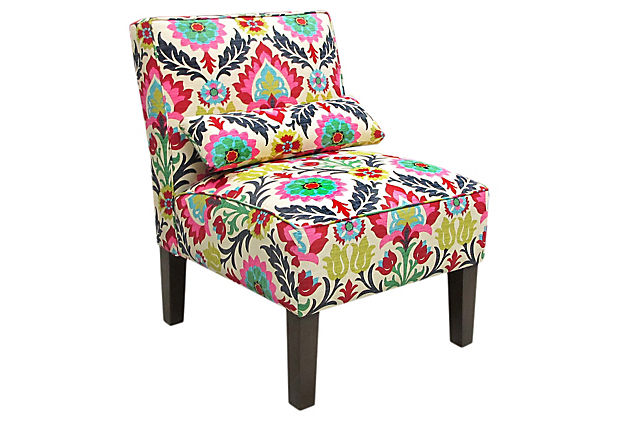
Chair from One Kings Lane that I purchased back in March

I am still in love with my chair from One Kings Lane, which funny enough didn’t end up in the bedroom but down in our Dining Room.  I still haven’t seen it anywhere else in this fabric (which is Waverly Santa Maria Desert Flower).

Leave a comment

Beautiful Mix of Fall Colored Perennials & Shrubs including Coral Bells in 2 Colors and Barberry

I hope everyone had a lovely weekend. Saturday was splendid here and we took the opportunity to head over to Tyler Arboretum to enjoy the fall weather and let the kids run around in the woods (and up into some treehouses). I have to say that Tyler is pretty great. Over the last few years they have added a lot of kid friendly treehouses and experiences, that are the right mix of nature paired with activities to keep the kids occupied. So if you are in the Philly area I highly recommend a visit.

I thought I would share a few of the interesting plants and creations that we saw on our visit.

Berm with tube for the kids to climb through.

Maisie loved this tube with a berm on top. I was impressed that the plants could survive on top, including a beautiful Oak Leaf Hydrangea and some purple beautyberry (which make excellent cuttings also). Depending on the topography of your yard this would be pretty easy to replicate.

Gnome Bridge: I love the use of twigs for guardrails

Palette Shed

I really liked this shed that used a palette vertically on one side and filled it with annuals. The vintage terracotta roof tiles are also a nice touch.  I think this would be an interesting idea for someone to liven up a boring shed.

Bamboo Teepee with Rock Seats

I really liked this extra large bamboo teepee, complete with large rock seats. I have a stockpile of bamboo, so I am excited to try replicating this somewhere (Zdenka I am thinking of your house).

Beautiful 7′ tall light purple asters

Very Interesting Mystery Plant: Can someone tell me what this is? Asclepias physocarpa? (Thanks Stacey!) The seed pods are amazing.

Beautiful Mix of Annuals still holding strong

2 Comments

Kids Dress Up Area with Picture Ledges Above

One of my kids favorite activities is dressing up. At least once a day Sam appears in some sort of “costume”. We have had a bin of dress up for a while, but I wanted to give the kids a spot with some hooks and space to see some of their accessories. I still need to weed out some things (the bin below is still full), but it feels good to have finally devoted a corner to this activity.

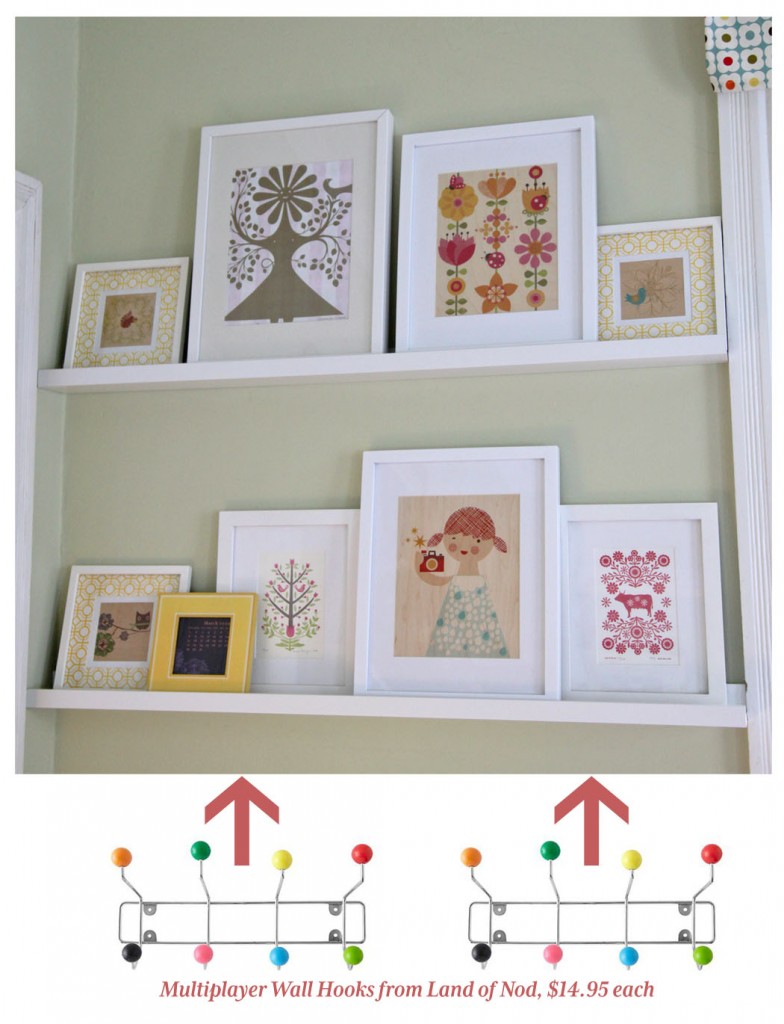
I ordered these cute hooks from Land of Nod. The hooks for the hats are just the removable hooks, since I figured they might change over time.

Hats & Colorful Hooks

Here is a run down of what I spent:
2 45″ Ikea RIBBA Picture Ledges (Cut down on one side to fit perfectly in the space): $14.99 x 2=$29.98
2 White 11×14 Picture Frames from Target (I already owned the rest): $12.95 x 2= $25.90
4 Removable Hooks: ~$5.00
2 Mutliplayer Wall Hooks from Land of Nod: $14.95 x 2=$29.90

TOTAL: $90.78

I was hoping to spend about $50 for the dress up area, which I fortunately managed to do. I spent a little bit more on the picture rails and frames then I had hoped, but it was nice to not have to make the rails from scratch, otherwise they would probably still be half finished (considering I only spent about an hour hanging the ledges and another half hour putting up the hooks). I think I am most excited about getting some stuff off of the floor and giving them a proper home, which makes it a lot easier for the kids to put their own stuff away.

I hope everyone has a great weekend! I am hoping to finally get the shelves organized.

Leave a comment

One of my goals for last weekend was to pick up some plastic storage for the playroom. So on Sunday after spending too long looking on the internet I headed over to Walmart to see what I could find. On their website they had some storage that looked promising and was a lot less expensive then the Land of Nod colorful plastic containers. I ended up buying a couple of different sizes of plastic containers in clear and blue. Of course once I got them home I started thinking about how else I could use them, which led to me reorganizing the kids’ arts and crafts area in the Dining Room and using some of the new storage boxes here. I thought I would give you a quick run down.

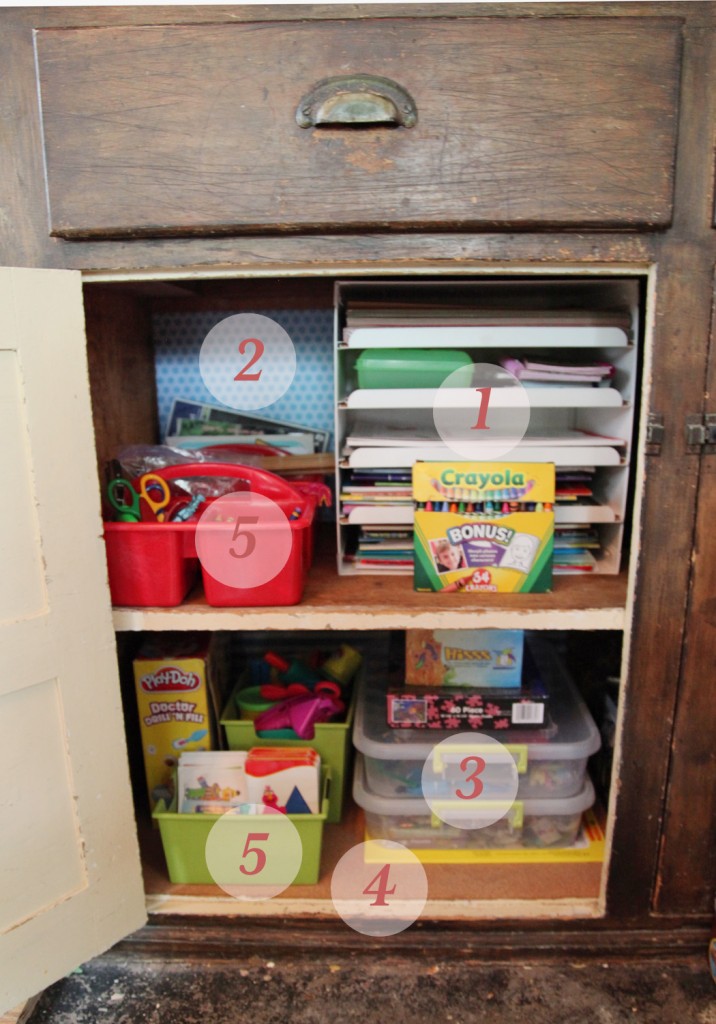
Kids Arts & Crafts Storage Area in the Dining Room

This area is used a LOT. My budding artists are always looking for their supplies and I have been working on making them as accessible as possible, while trying to keep them organized.

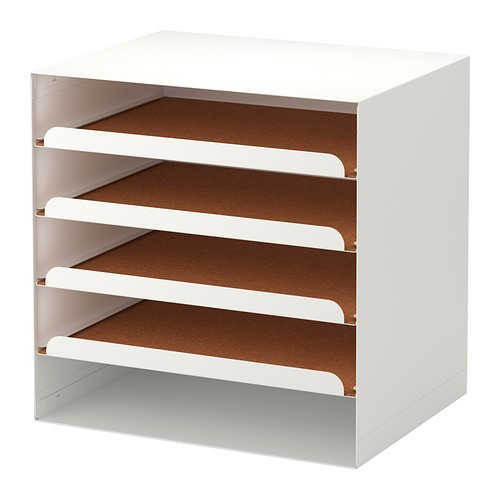
Kvissle Letter Tray from Ikea, $20

1. Kvissle Letter Tray (Ikea, $20): I bought this a couple of months ago to help store the kids paper and coloring books. I quite like it. The only downside is that the “drawers” pull all the way out. I solved that by having it overlap with the cabinet framing by an inch, which acts as a stop.

2. Scrapbook Paper: I don’t scrapbook (I don’t have the patience) but I do like the paper. When I see cute packs on sale at Michael’s or JoAnn’s I will pick them up. I have a pack that I picked up in June for Sam’s party. I still have a lot left over. Fortunately the paper fit almost perfectly at the back of the cabinet. I just used permanent double stick tape to put it in place. You can’t see but I have a stripe in the same color at the back of the bottom shelf.

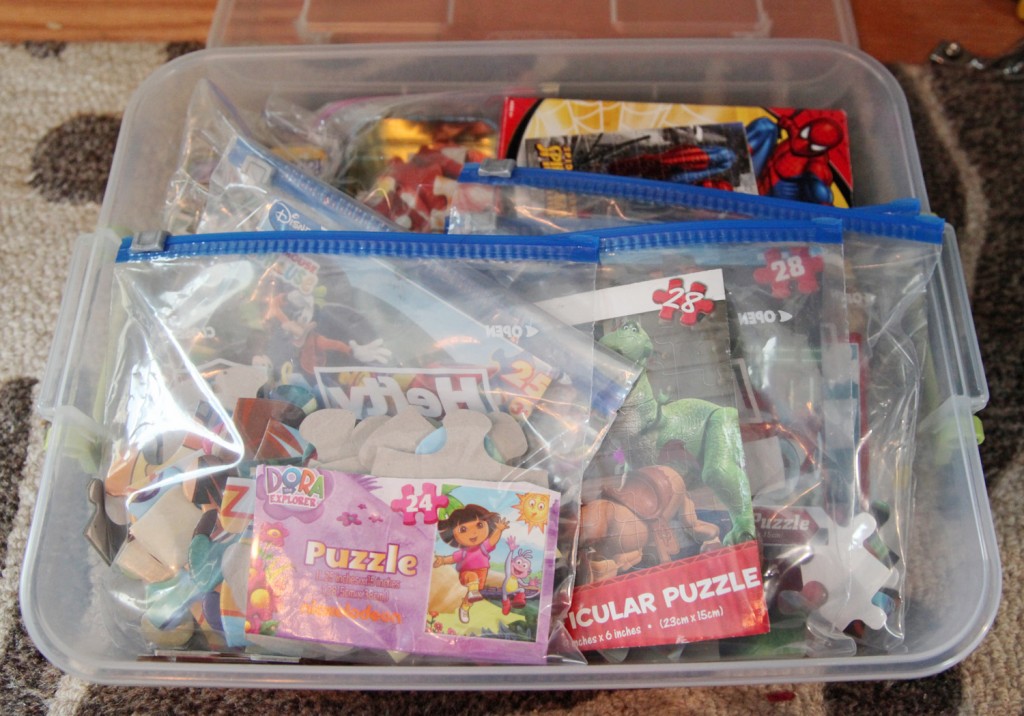
Kids Puzzles packaged in baggies: They take up a lot less space now but are easy to find

3. Sterlite Latch Box (1.55 Gallon $3.75): I like the size of these containers (11.5″x15″x 3.25″). They will fit a piece of paper and are shallow enough not to loose stuff. They also fit well in the Expedit shelves. So far I have used 2 of them. One for puzzles and one for smaller arts and crafts supplies. I heard rumors that Walmart is discontinuing this model (of course now that I found something I like). So I am considering picking up some more. I really like how the handles keep the box snapped in place. They also stack well and are designed to stack with the smaller sizes. I also picked up some that are 1/4 this size (so 4 fit nicely on top).

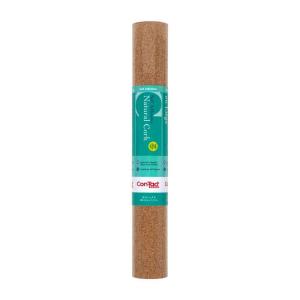
Cork Liner, Home Depot $9.95 for 18″x48″ piece

4. Cork Bottom/Liner: I had some leftover cork from a project a few years ago. It had started to dry out and crack so I wasn’t sure if it was going to be useable, but after removing the gross 1970s wallpaper that was covering the bottom of this shelf I decided that cork would be perfect here. The bottom was pretty gross and I was going to either have to do a lot of prep to paint it or just clean it and glue down some cork. Fortunately the old cork adhered pretty well and the cracks mostly disappeared once it was glued in place. I need to buy some more for the top shelf, but fortunately it is quite reasonably priced.

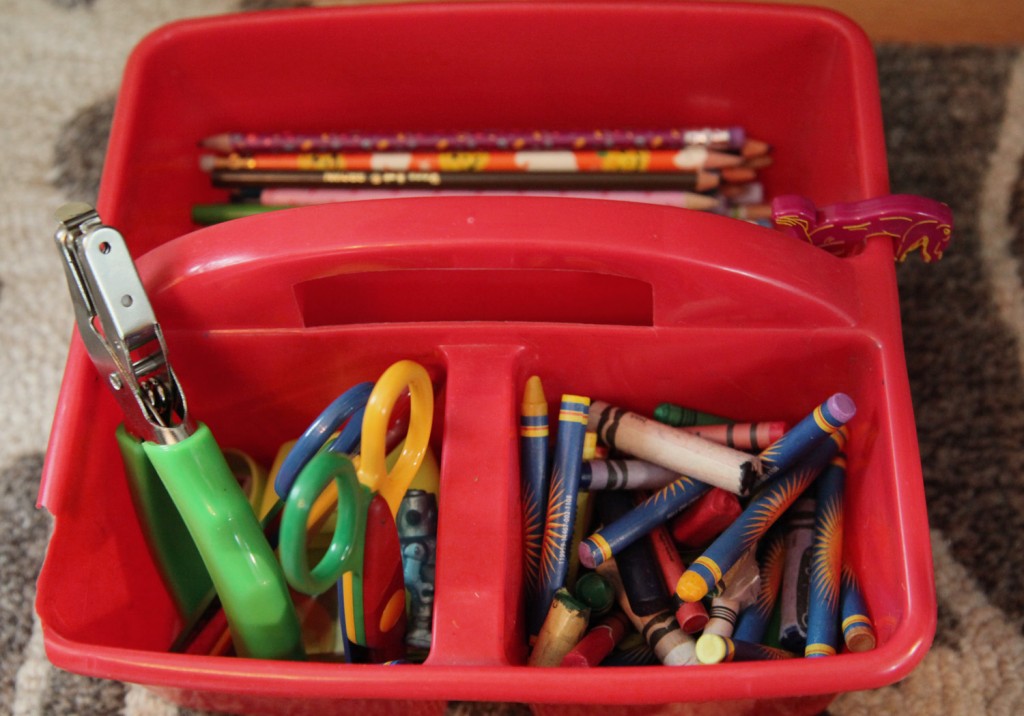
Drawing Bucket from the $1 section at Target

5. Miscellaneous Open Storage: I also have a mix of plastic open storage buckets and boxes. Most of these came from the $1 store or target. These red buckets that store the kids everyday coloring and drawing stuff is a favorite. They are good about pulling these out and putting them back when they are done.

We also have other arts and crafts supplies stored up high (where little fingers can’t reach)that are only for when they are supervised (including markers, paints, specialty paper and stickers).

Does anyone else have good storage ideas for the kids arts and crafts stuff?


Leave a comment

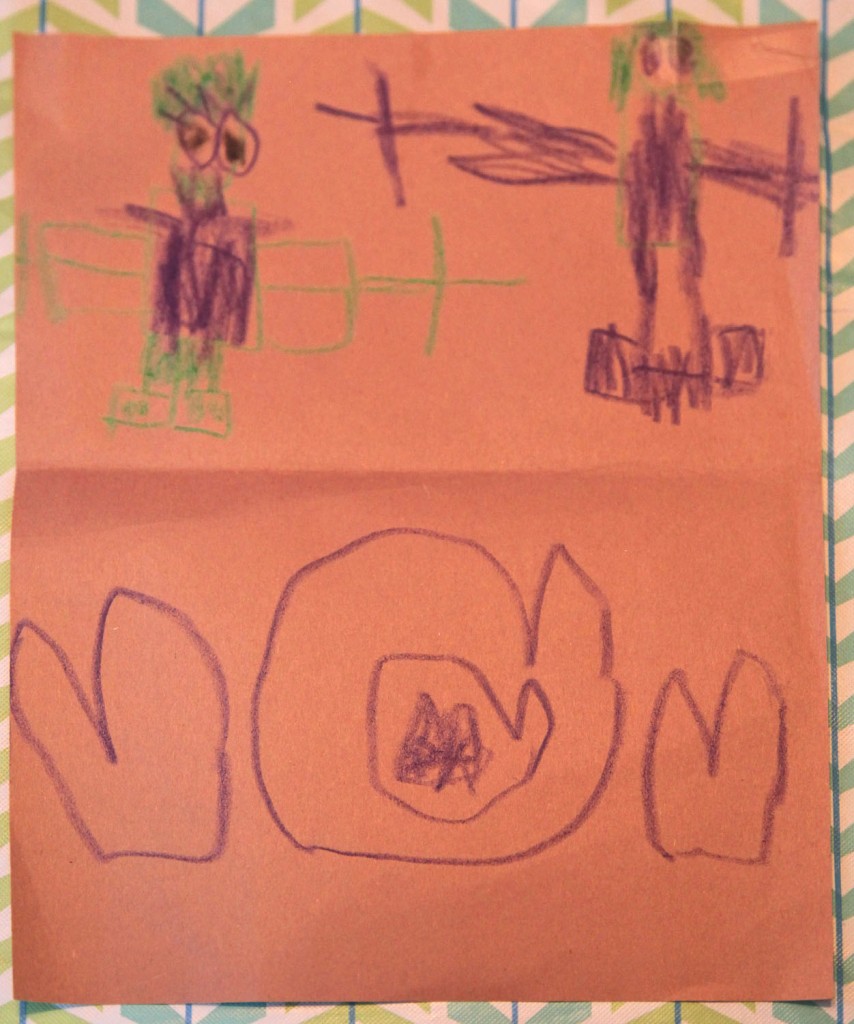
Anniversary Card from Sam (I’m the one on the right, Mr. S. is on the left)

We celebrated our 11th Anniversary over the weekend! Which included actually going out to dinner without the kids. Last year we managed a whole 2 1/2 days away in Charleston, but this year dinner will have to do. We did get some good family time in over the weekend, including snuggling on the couch while watching some TV. Maisie napped while snuggled up with us, which hasn’t happened in quite a while and probably won’t happen very many more times (sniff, sniff).

Today I wanted to share the lovely card from Sam. He got up early on Sunday morning and came downstairs while we were still in bed hanging out.  Then he worked secretly in the corner of the Dining Room and wouldn’t let us come in until he was done.

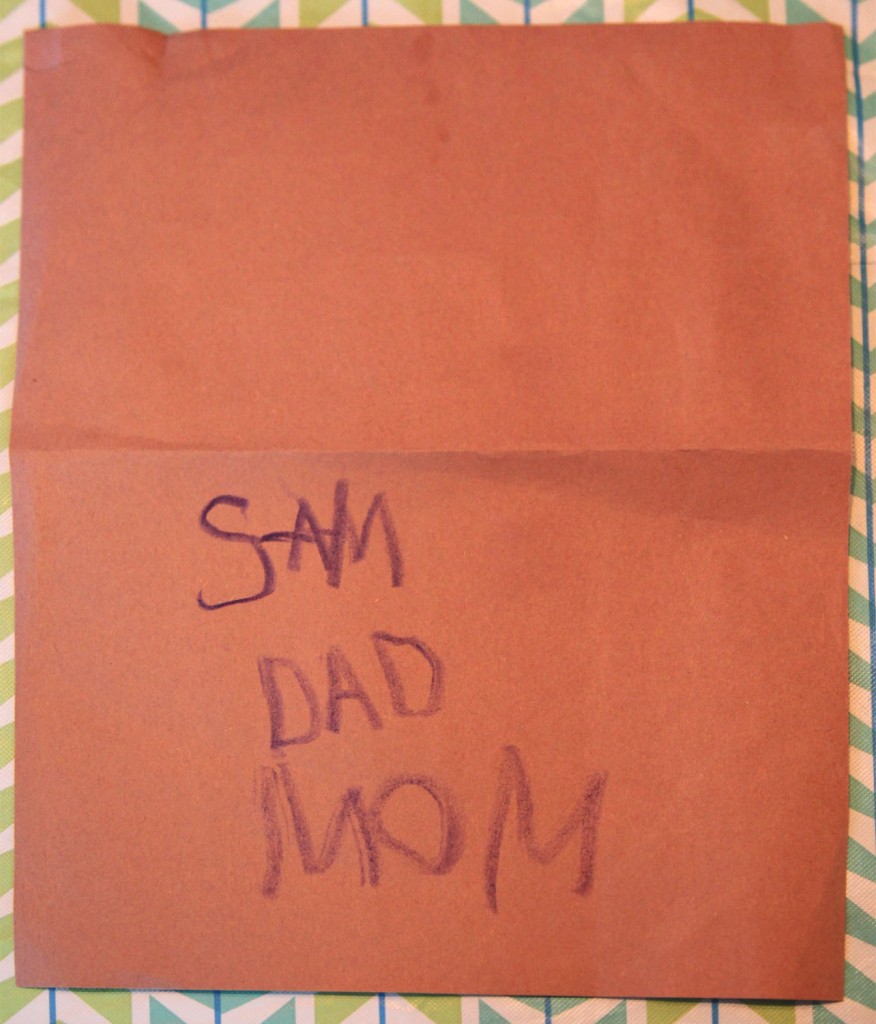
He drew a lovely picture of Mr. S and I. I somehow got to be the tall one (which is pretty funny since Mr. S. is 10″ taller than me). The lower portion of the page are hearts. Then he wrote his name and our names without any help.

Sam’s writing, age 5

He was so proud of himself! Sometimes they just melt your heart and all of the naughty, whiny things they do go out the window.

I hope everyone had a lovely weekend!

1 Comment

Double Height Expedit Shelves (totally disorganized)

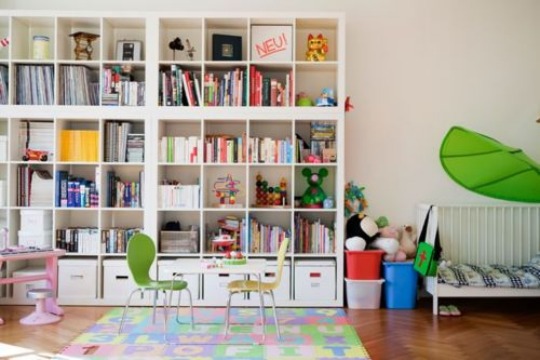
I had a little time yesterday afternoon, while Maisie napped and Sam watched some “boy” TV so I took the opportunity to put together the second Expedit Shelving Unit. One thing our house has is height (9 1/2′ ceilings on the first and second floor). So after I saw that multiple people had double stacked these units, I was sold! We were limited in our footprint and cold only fit a 4 wide unit (I would have loved a 5 wide unit), so I am happy to make up for it up high. A lot of these cubes will be used to hold out of season clothes, kids artwork and things we don’t need to get to very often since I definitely need a ladder for the top row.

This was my inspiration:

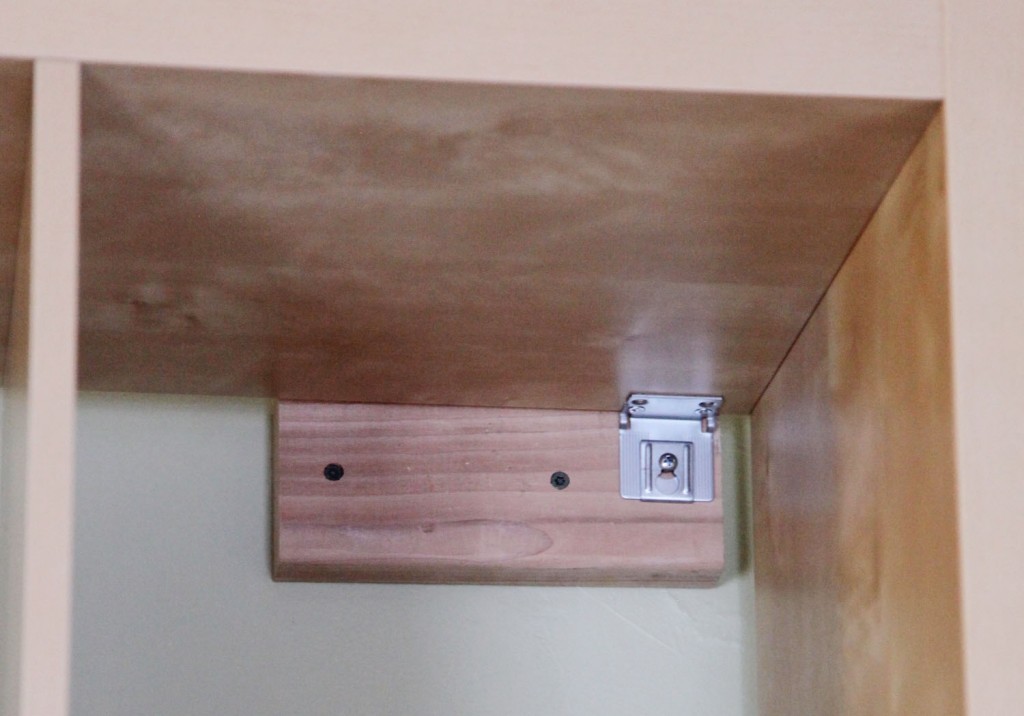
I was a little nervous about stacking them until I installed the bottom unit and felt how sturdy it was with the wall attachments. Ikea gives you an angle for the 2 top corners. Then you have to determine how you are going to attach it to the wall. We have thick molding, so after some trial and error, I went with 8″ long 2×4 blocking. This way I could get a couple of 3″ decking screws into the wall. Once I felt like the blocking was secure I screwed the unit to the blocking. The angle attachment has a second piece that clamps down when tightened. I was really pleasantly surprised at how well it was attached.

Wall Attachment for the Expedit (Bracket comes with unit)

The second unit went together in about an hour (the first one took about 2 hours due to the size). Then I just needed to wait for Mr. S. to come home to help me lift it. It was actually easier than I thought. I screwed the blocking onto the wall and attached the angles to the unit ahead of time, to minimize the amount of work that I would need to do once it was in place. It only took me a couple of minutes to screw it in place after it was up.

Upper Shelf after being Installed

Pretty exciting, huh! Okay, so the room looks like a disaster still, but at least I finally have some space to put things. I even have a couple of empty boxes. Fortunately there is also a little bit of space at the top for some of our more fragile items. And I have gotten over my issues with having the same shelf as half of America.

Stay tuned for some styling next week!  I also haven’t bought any additional storage bins yet. I am going to try and get the kids to do some toy sorting with me this weekend, so we can determine what we actually need. Baby steps. Lots of baby steps!

2 Comments

Artwork for the Playroom, sitting on Ribba Picture Ledge from Ikea, $14.99

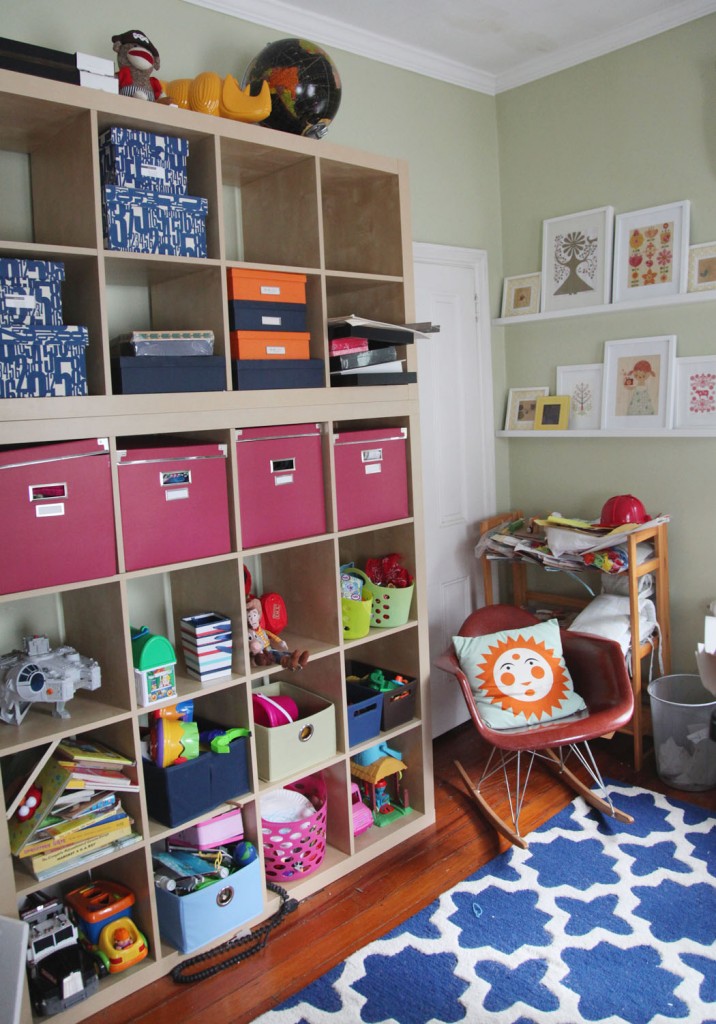
The playroom is still a mess but I did manage to install 2 picture ledges from Ikea. Then I was able to put up a lot of the artwork that had been sitting around for longer than I would care to admit. I also picked up a couple of new white frames at Target. I was getting pretty frustrated finding white frames. I had bought some from Michael’s before but they don’t seem to sell plain white frames anymore.  Plus the 2 prints that I had from Petit Collage were already matted so I needed an 11×14 frame so Ikea was out. Finally I went back to look at Target again and they had just what I needed. Oh how I love you Target!

Below these ledges I am going to hang hooks for all of the kids dress up clothes (which are quite substantial and well used). I think I have settled on these Multiplayer Wall Hooks from Land of Nod. I was hoping to find something a little cheaper, but I did a quick search and didn’t come up with much (even if I painted them). The added bonus is that they aren’t pointy, so it should minimize injury (at least I can hope). It won’t be as nice as Chloe’s DIY costume closet (which I adore), but I think it will be well used.

What you can’t see is my old college shelf below stacked high with kids artwork. I have been meaning to photograph these for about a year. Now I really need to get on that! Then I can just keep a few and move the shelf out of the way.

I hope everyone is having a good week! We are having some beautiful fall weather. So nice and crisp!

2 Comments

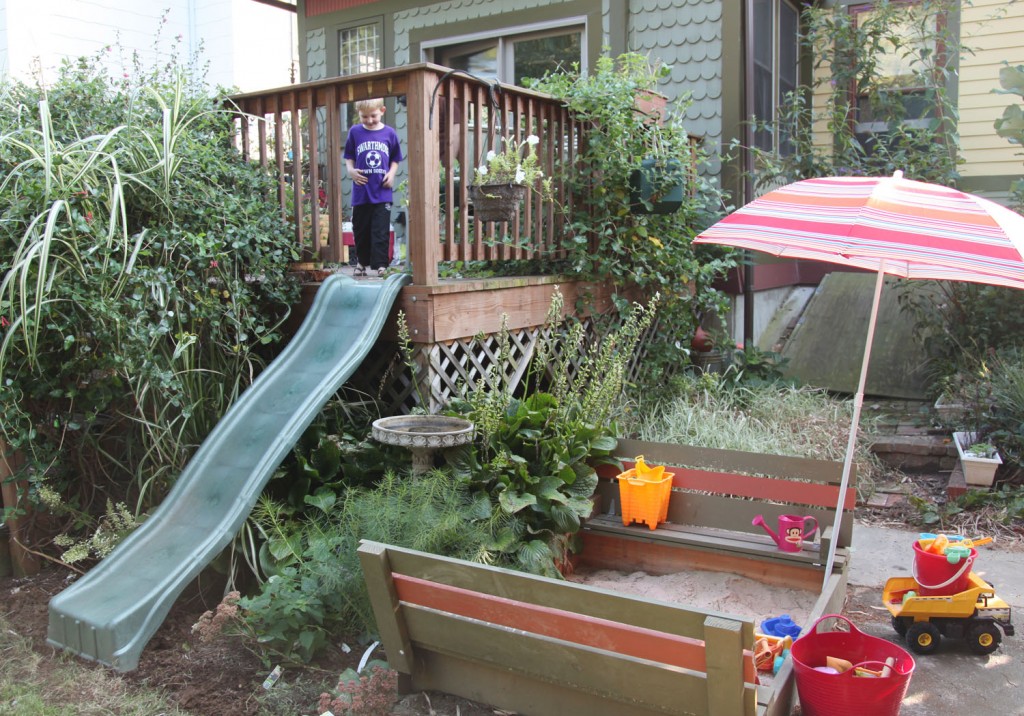
Sam seeing the slide installed for the first time

Well it has been a long time coming, but we finally have a slide set up off of our deck! I first thought about adding this a couple of years ago, since we don’t have space in the yard for a full swing set. This spring I put a plan together and figured out where to put the sandbox and swing. The only component left was the slide. Then I looked and looked on Craigslist, with no luck. Then summer hit and the last thing on my mind was working out in the yard. Well at the end of the summer I got lucky and someone about a block away put a slide out for the garbage. I drove past it and got very excited. We were on our way to a kids birthday party and couldn’t stop. I thought sure it would be gone by the time we got back, but fortunately it was still sitting there. I walked over and found that it was in incredibly good shape and looked to be about the right height! Then I proceeded to run down the block with it like a silly kid.
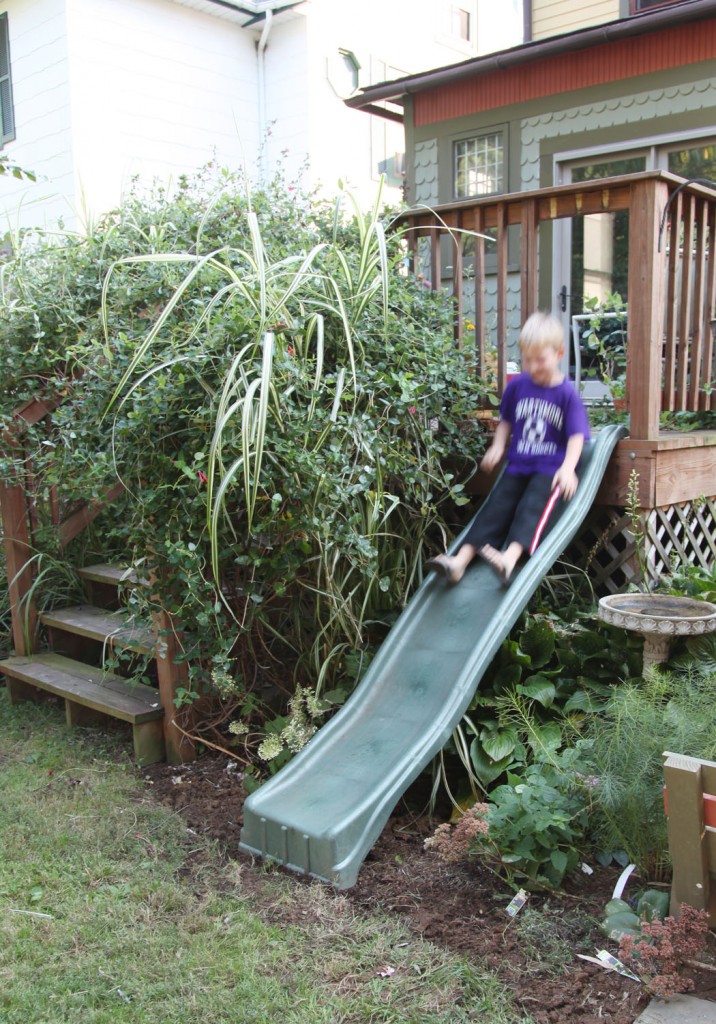
Sam testing out the new slide

It has been sitting in its new home for the past month waiting for me to get around to cutting the handrail and bolt it in. This weekend I got tired of the kids asking if it was “nailed in yet” and decided to get it functioning while they watched a movie.
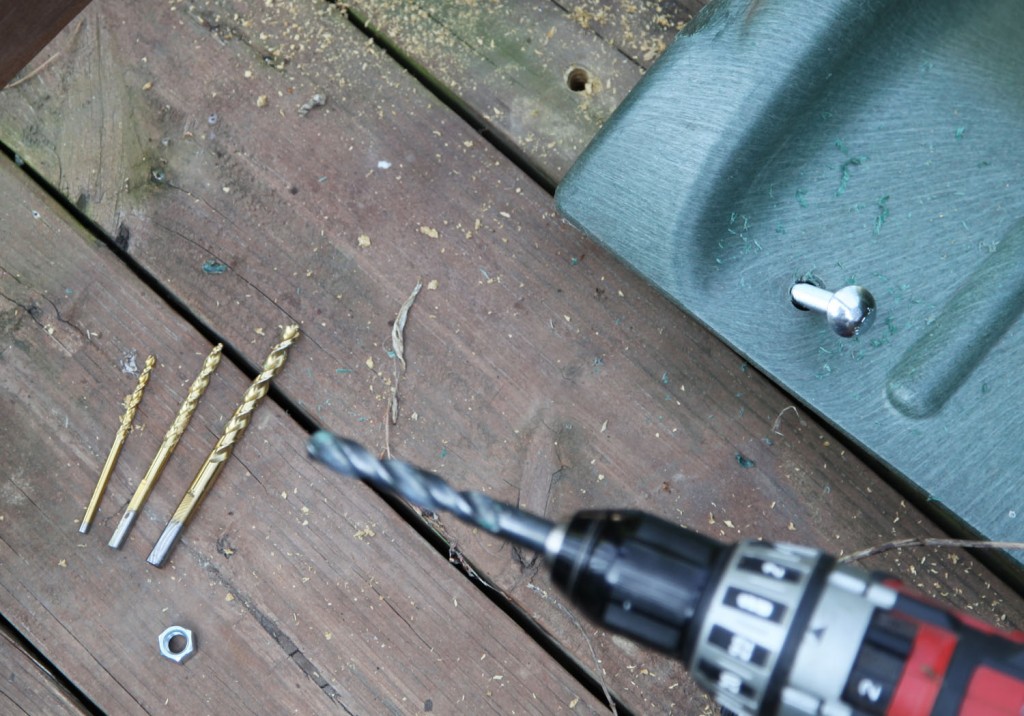
Drilling for the new Carriage Bolts to hold the slide on the deck

The first step after determining the rough location was to determine how I was going to attach the slide. The slide had 2 holes at the top. I decided to reuse these and bolt through the deck. Our decking is 1 1/2″ thick pressure treated wood. This gave us a nice strong material to bolt through. I drilled a small pilot hole at each location to make sure it was a clear shot. I ended up having to shift it over about 1/4″ to miss the joist underneath.
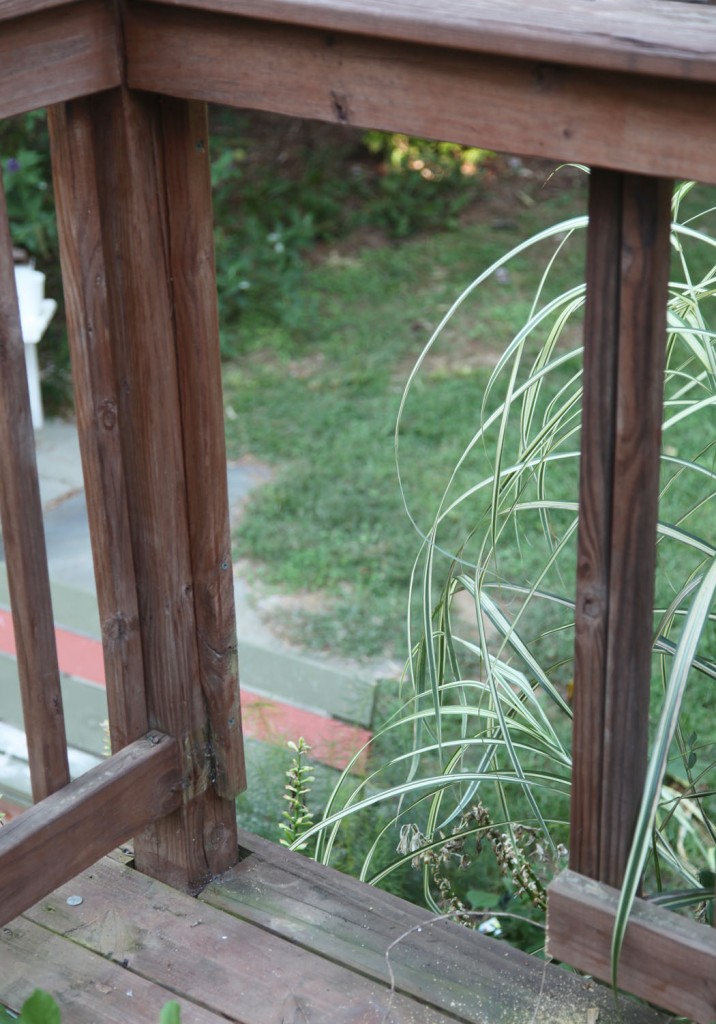
Guardrail after removing the spindles and lower horizontal member.

Next I removed the portion of the guardrail that was in the way. I unscrewed the vertical spindles. Then I took one of them and doubled up the spindles on the freestanding side. Then I used a sawsall to cut the bottom member.

Then I drilled the final larger holes and bolted them in with carriage bolts (the kind that are round and smooth on top). I also used a large washer underneath (to increase the bearing on the wood) and then a locking washer (to keep it nice and tight) and finally a hex nut. I used a 3/8″ carriage bolt. It looked nice and sturdy and I new that the top would cover the slide holes.  I spent about $3 for the bolts, washers and nuts. Pretty good deal!

Finally I had Mr. S. stand on top of the slide to make sure it was nice and tight and I used a wrench underneath to do the final tightening.

Our deck is a little over 5′ off of the ground (a lot of play slides are designed for 5′). So after the top was installed I did a little regrading at the bottom. I also made sure that the bottom of the slide was firmly in the dirt (by about an inch) so that it wouldn’t move.

The slide is definitely a little steeper than it would be on a playset, which makes it extra fast. The kids LOVE it. I think if I had smaller kids I would have added some additional dirt to the bottom.

Here is my rendering from this spring:
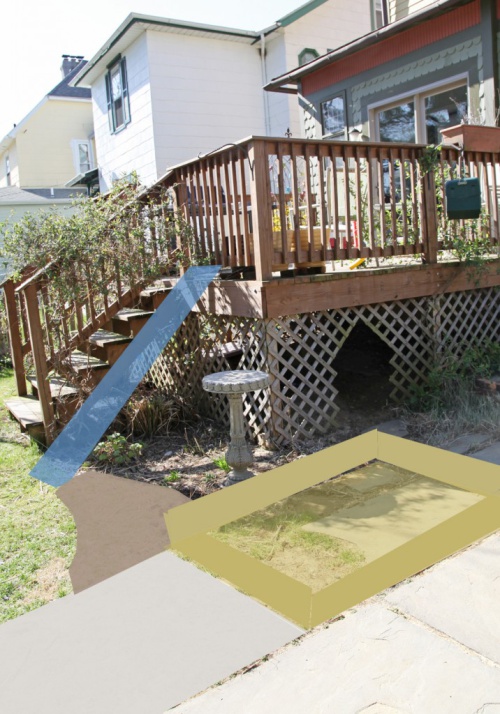
Rendering of play area from this spring.

And here is our play area now:
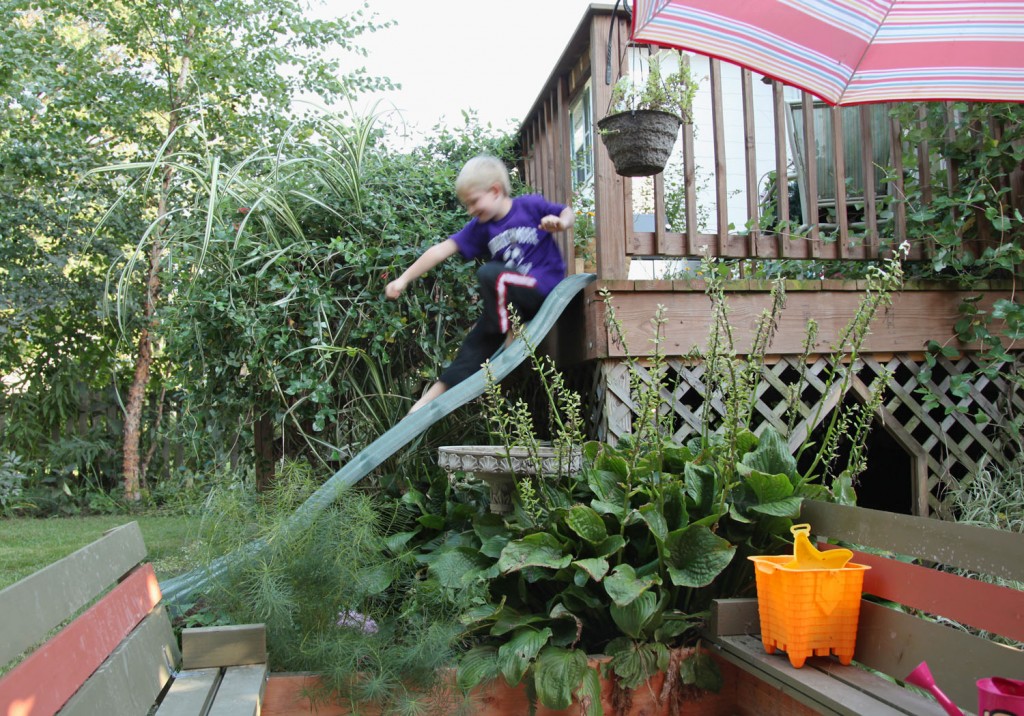
Sam making good use of the “new” slide.

I am pleased to be able to give them areas to play outside without sacrificing a large portion of the yard to swing set. What do you think?

13 Comments