The Closet Units:
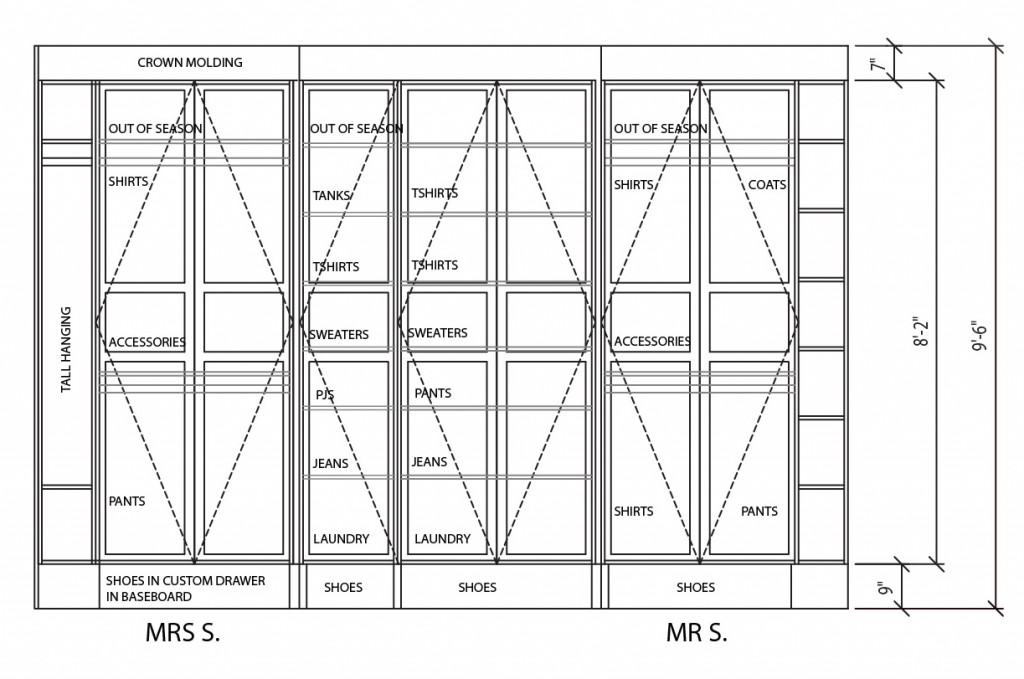
Trying to determine the best way to fit closets into our bedroom has been difficult. I think I’ve done about 8 options all together over the last year. I pretty quickly decided that we should use the Ikea PAX system as the basis for our system. Not only are these relatively inexpensive, but they offer a LOT of options for shelves, drawers and boxes. We should be able to maximize the interior space of these units with the accessories that are designed to fit perfectly into the spaces. We considered custom doors, but in the end decided to use the PAX standard 20″ wide doors, which means using the 20″ and 40″ wide units. These units come in 2 depths and 2 heights. Because we have tall ceilings we could use the taller height, and still have space left over.
We will be using both available depths for the closets. The deeper units will be on either side for hanging clothes. The shallower units will be in the middle for folded clothes. We have gone bath and forth about which depth to use for the middle units. In the end I don’t want to lose the extra 10″ of depth in the bedroom. I am hoping with the double stacked hanging rods in the side units that we will be in good shape with hanging space. We currently fold a lot of our clothes, but I think we will able to hang more of our pants in the new scheme.
The Base:
To maximize the usable height and create more of a built in look we are going to sit the IKEA closets on a base. The base will be made of 2x8s and we will try and reuse the existing wood base for the face. So as not to waste any potential storage, we plan on making hidden drawers in the bottom. I haven’t designed all of the details for this yet and part of this will probably be decided once we finish demo and determine the floor condition. We will either use heavy duty drawer tracks or casters on the bottom (with slots to keep them straight). I will probably also add some handles (so they won’t look completely hidden). We installed a similar base detail (without the drawers) in the Living Room.
The Side Units:
On either side of the main closet units we have some left over space. So as not to loose any potential storage, we are planning on making custom boxes for these locations. These will be made out of MDF sheets. Since we don’t currently have access to a table saw, I will draw out the cuts on a 4×8 sheet and send it over to the lumber yard. Most good lumber yards will cut down the sheets to specific dimensions for a reasonable price. This makes transporting the pieces much easier and makes my install quicker. We will paint the mdf white to match the rest of the system (ideally before assembly). I have considered adding doors to these, but given how narrow they are I don’t think it is worth it. I could always add some later if they it looks out of place. I would make those out of 1/2″ mdf as well.
The Crown Molding:
For the top I think we are going to fill the leftover space with painted mdf and install crown molding. I am leaning towards replacing all of the crown molding in the room (since we will be adding new drywall to the ceiling) and it will all need to be removed. Then we can use something similar to the crown molding in the Living Room and Dining Room. I may reuse the crown molding elsewhere in the house.
To see Part 1: For Our Bedroom Part 1: The Goals


