Archives For DIY

Piano Decorated for Christmas

I hope everyone had a lovely weekend. We had a low key weekend here, including an afternoon curled up watching a movie together after putting up the Christmas tree. As much as there is a certain amount of annoyance with putting up our artificial tree, at least the kids are actually old enough to enjoy hanging up the ornaments (even if it isn’t in an evenly distributed manor), and we don’t have to worry too much about hanging the ornaments up so high.  In addition to our big tree I also put up our little silver tree (that I picked up on clearance last year).

Bowl of Ornaments and Small Silver Tree

I have changed up the top of the piano again! I guess in a busy house it is nice to have control of one area (even if it is a small one). It is also one of the few areas that the kids are good about not touching. I decided to put the cute little silver tree here and filled it with miniature ornaments that I have had since my apartment days. I wasn’t sure what to pair it with until I was strolling through the aisles at Target. I saw these cute (non-shattering) Christmas ornaments in lots of delicious colors. I decided that these were worth a try. I wasn’t sure whats I was going to do with them. I was considering making a wreath, especially after I saw this super easy tutorial by Eddie Ross, but then I remembered that I had this beautiful glass bowl (that is normally stuffed behind some stuff in an upper kitchen cabinet).

The 2 boxes of ornaments worked perfectly! Then I pulled out a cute cat figurine and a vintage angel candle snuffer. I think it could still use a few more little things, but for now I am quite enjoying it, especially because we spend so much time back in this area of the house.

Remember here is where I started this summer:

And here is this fall:

And here we are for Christmas:

I think my favorite thing about it is that the ornaments pick up on the colors from the chair (which I still really love).

How are your holiday decorations coming?

3 Comments

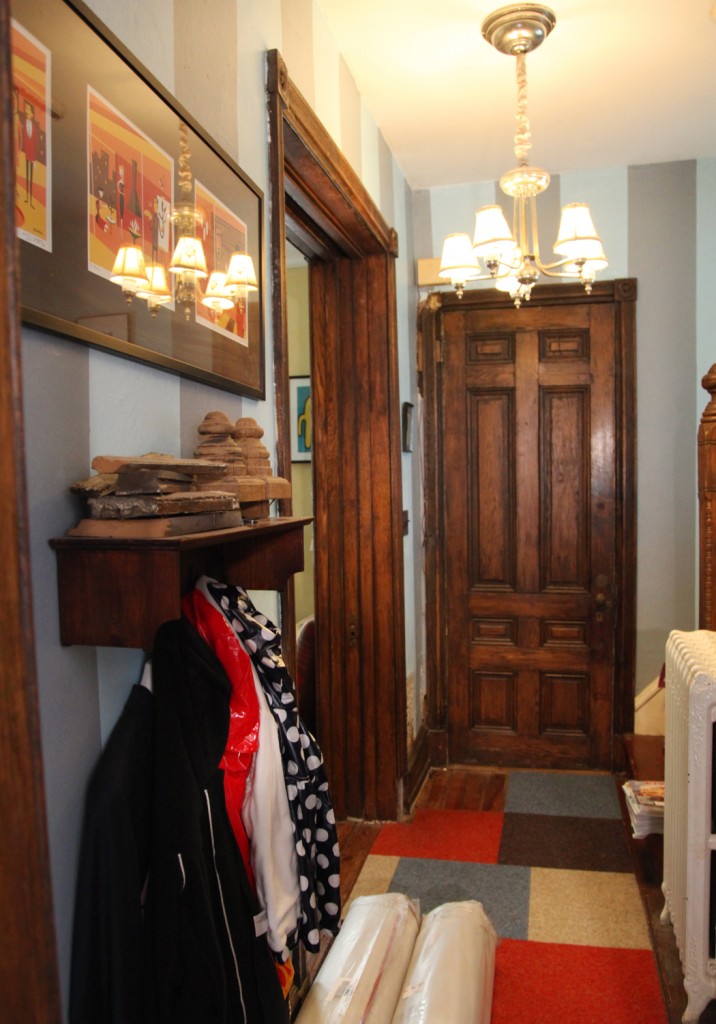
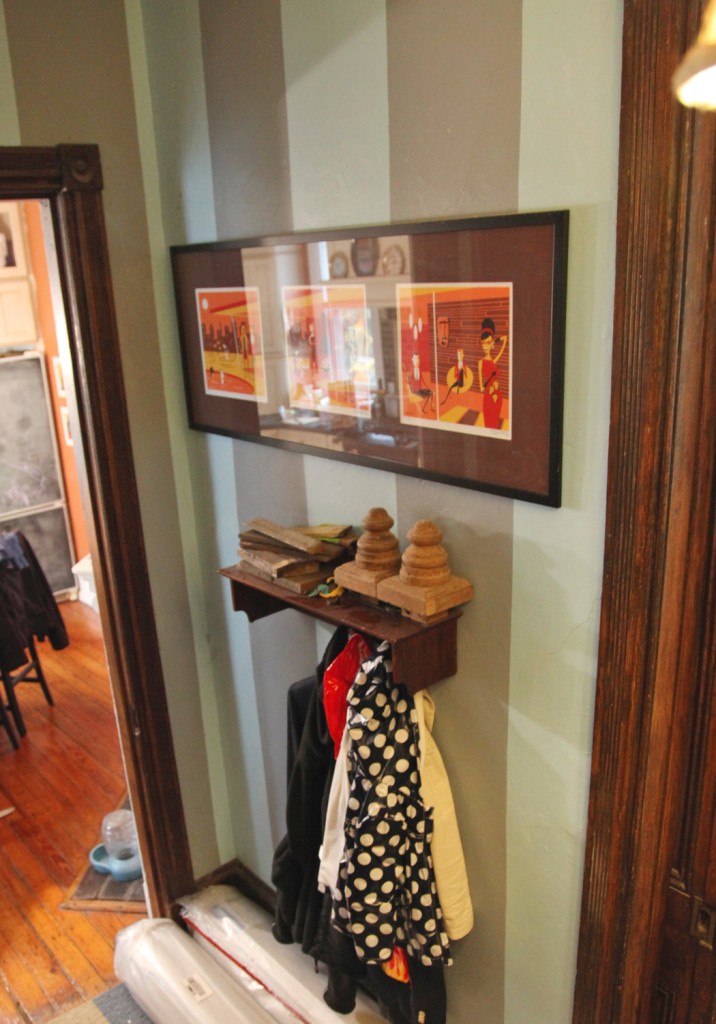
Hallway Before with undersize Coat Rack (try to ignore the rolled up carpet that needs to go upstairs and the miscellanous house trim sitting on top of the shelf)

Sorry I haven’t posted this week! I hurt my shoulder/back, making everything I do much more difficult. I am hoping that it heals soon!

I feel like I have a million projects started and nothing anywhere closed to finished. I would like to concentrate on our bedroom, but there are a couple of unknown pieces (i.e. future air conditioning and adding additional electric) that have put that on the back burner again. The new carpet is still rolled up in the front hallway. I am hoping to put that in soon so at least I can enjoy something soft on my feet in the morning.

So what is next on the agenda? I decided this week that I NEED to do something about the coat rack in the hallway. I have been trying to come up with a plan for this area for a couple of years now and it never seems to be a priority, but with the cold weather setting in, the number of coats have gone up and our little coat rack isn’t cutting it, never mind that the hooks keep breaking off! I am also looking for a better way to sort mail, besides sitting on the kitchen island.

Old Coat Rack looking really tiny here

Here is my list of requirements:

Zdenka’s Front Hall that I designed last year

1. LOTS of Coat Hooks at 2 Levels (Uppers for the grown ups and longer coats and Lower ones for the kids coats and backpacks). Similar layout to Zdenka’s front hall.

2. Shelves for holding mail baskets (ideally 3 baskets that hold 8 1/2 x 11 paper). I like this shelf from Martha Stewart.

3. The design needs to work with the Victorian feel of our front hallway (dark wood, preferably oak with Victorian brackets)

4. The design can’t stick out more than about 10″, so it doesn’t infringe on the main walking path.

5. I would love a bench, but I don’t think we will have space.

6. Have it done by Thanksgiving!

The Design:

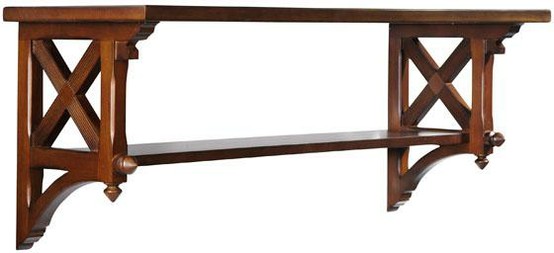
I was planning on making something from scratch, since I want to maximize the 53″ of width. I have some sketches, but nothing that I was totally in love with. Then I found this shelf in the latest Home Decorators Catalog! It is stylistically almost perfect. The size is a little short though.  I am currently considering ordering it, and then tweaking it with a new wider top shelf and then adding a board below to hold the hooks. What do you think? Is it lame not to make it from scratch? The only other downside is that it isn’t oak, so the wood won’t totally match.

I have also picked out the coat hooks. I’m obsessed with dome style hooks, because they do a much better job of not pulling on the back of the coat. I found several but I really like this simple design. I plan on mixing these with some more regular hooks, to hold other things.

So stay tuned for more details!

2 Comments

Fall Decorations for the Piano

I have to start by saying that I am not someone who typically does a lot of seasonal decorating inside the house. I don’t have the patience. Although lately I’ve been trying to pay more attention to my surroundings. I have found that the piles that creep into my house stress me out (I assume it isn’t just me) but having some nice things to rest my eyes on, even for a moment, does make a difference in my mood.

Fall Decorations

The area that I have been most continuously trying to keep clean and pretty is the top of the piano. It is the first thing you see when you come in the back door. I have also found that by putting a few nice things on top that I am much less likely to start piling things on it.

Piano area during the summer

I did have some birdhouses that the kids painted on top. I was recently feeling like I wanted to change it up with something that is a little more fall inspired. It also helps that I have been doing some shopping at Target.

Green Bottle, Target’s Threshold line on clearance (~$4.50), Marrakesh Bowl by Nate Berkus for Target ($7.99), Scarab (from Egypt), Woodpecker candle holder by Patch NYC for Target (on clearance)

I switched out the kids artwork for some metallic and green colored items. It started with the woodpecker candle holder by Patch NYC for Target. I had admired a lot of the items from this limited line but I had at least partially restrained myself and bought the matching lamp and pillow. Then Target started marking down some of the items a couple of weeks ago. So when I saw this one half off, I pounced. I wasn’t sure where I should put it, but then I saw the old bronze plate and thought some metallic in this area would be a nice change. So I scrounged around the house and found this scarab that a friend had given us. Then I saw the bowl from the new Nate Berkus line at Target.

I also literally picked up several of these “Osage Orange” from the kids daycare. They have a couple of Bois ‘D Arc trees on the property. For some reason I grew up calling them “monkey brains” (Did anyone else call them that?). They are a funny fruit, that is native to the US. They have an interesting history. They aren’t actually edible but they apparently repel bugs (good for storing in your pantry) and they smell nice like a mix of citrus and pine.  The trees are thorny and were used as “fencing” for early settler in the Midwest. And its name translates to “tree of the bow” since the branches make good bows. I am such a sucker for an weird and interesting plant!

I hope everyone has a lovely weekend. My thoughts are still with my family and friends without power.

3 Comments

Kids Dress Up Area with Picture Ledges Above

One of my kids favorite activities is dressing up. At least once a day Sam appears in some sort of “costume”. We have had a bin of dress up for a while, but I wanted to give the kids a spot with some hooks and space to see some of their accessories. I still need to weed out some things (the bin below is still full), but it feels good to have finally devoted a corner to this activity.

I ordered these cute hooks from Land of Nod. The hooks for the hats are just the removable hooks, since I figured they might change over time.

Hats & Colorful Hooks

Here is a run down of what I spent:
2 45″ Ikea RIBBA Picture Ledges (Cut down on one side to fit perfectly in the space): $14.99 x 2=$29.98
2 White 11×14 Picture Frames from Target (I already owned the rest): $12.95 x 2= $25.90
4 Removable Hooks: ~$5.00
2 Mutliplayer Wall Hooks from Land of Nod: $14.95 x 2=$29.90

TOTAL: $90.78

I was hoping to spend about $50 for the dress up area, which I fortunately managed to do. I spent a little bit more on the picture rails and frames then I had hoped, but it was nice to not have to make the rails from scratch, otherwise they would probably still be half finished (considering I only spent about an hour hanging the ledges and another half hour putting up the hooks). I think I am most excited about getting some stuff off of the floor and giving them a proper home, which makes it a lot easier for the kids to put their own stuff away.

I hope everyone has a great weekend! I am hoping to finally get the shelves organized.

Leave a comment

Double Height Expedit Shelves (totally disorganized)

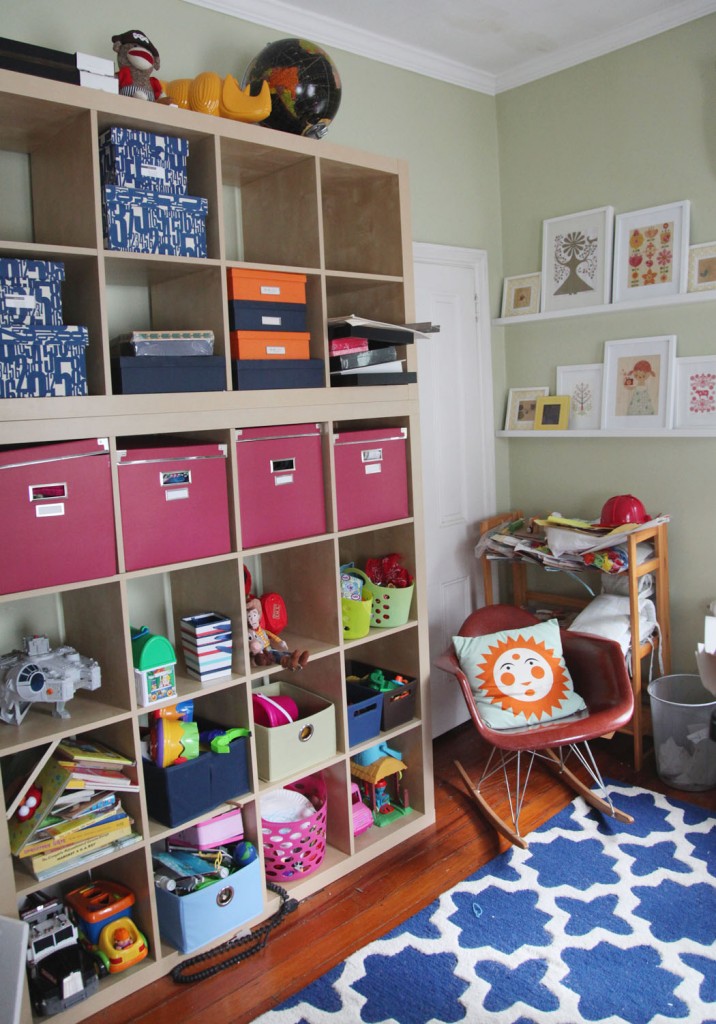
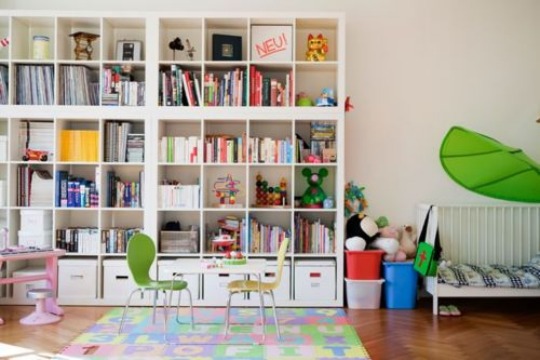
I had a little time yesterday afternoon, while Maisie napped and Sam watched some “boy” TV so I took the opportunity to put together the second Expedit Shelving Unit. One thing our house has is height (9 1/2′ ceilings on the first and second floor). So after I saw that multiple people had double stacked these units, I was sold! We were limited in our footprint and cold only fit a 4 wide unit (I would have loved a 5 wide unit), so I am happy to make up for it up high. A lot of these cubes will be used to hold out of season clothes, kids artwork and things we don’t need to get to very often since I definitely need a ladder for the top row.

This was my inspiration:

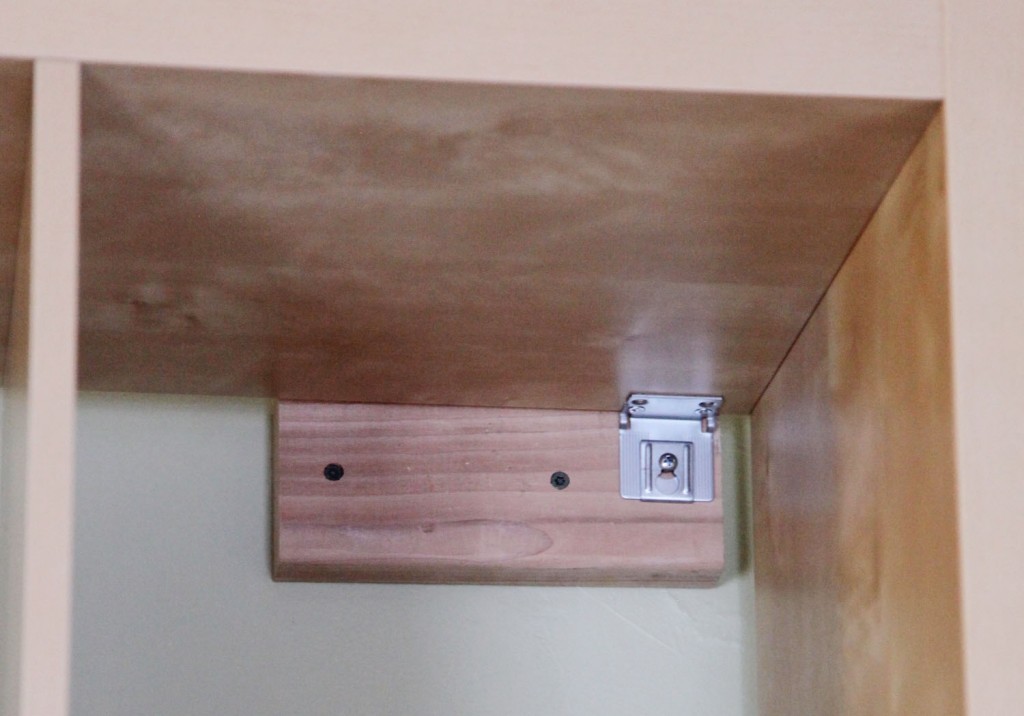
I was a little nervous about stacking them until I installed the bottom unit and felt how sturdy it was with the wall attachments. Ikea gives you an angle for the 2 top corners. Then you have to determine how you are going to attach it to the wall. We have thick molding, so after some trial and error, I went with 8″ long 2×4 blocking. This way I could get a couple of 3″ decking screws into the wall. Once I felt like the blocking was secure I screwed the unit to the blocking. The angle attachment has a second piece that clamps down when tightened. I was really pleasantly surprised at how well it was attached.

Wall Attachment for the Expedit (Bracket comes with unit)

The second unit went together in about an hour (the first one took about 2 hours due to the size). Then I just needed to wait for Mr. S. to come home to help me lift it. It was actually easier than I thought. I screwed the blocking onto the wall and attached the angles to the unit ahead of time, to minimize the amount of work that I would need to do once it was in place. It only took me a couple of minutes to screw it in place after it was up.

Upper Shelf after being Installed

Pretty exciting, huh! Okay, so the room looks like a disaster still, but at least I finally have some space to put things. I even have a couple of empty boxes. Fortunately there is also a little bit of space at the top for some of our more fragile items. And I have gotten over my issues with having the same shelf as half of America.

Stay tuned for some styling next week!  I also haven’t bought any additional storage bins yet. I am going to try and get the kids to do some toy sorting with me this weekend, so we can determine what we actually need. Baby steps. Lots of baby steps!

2 Comments

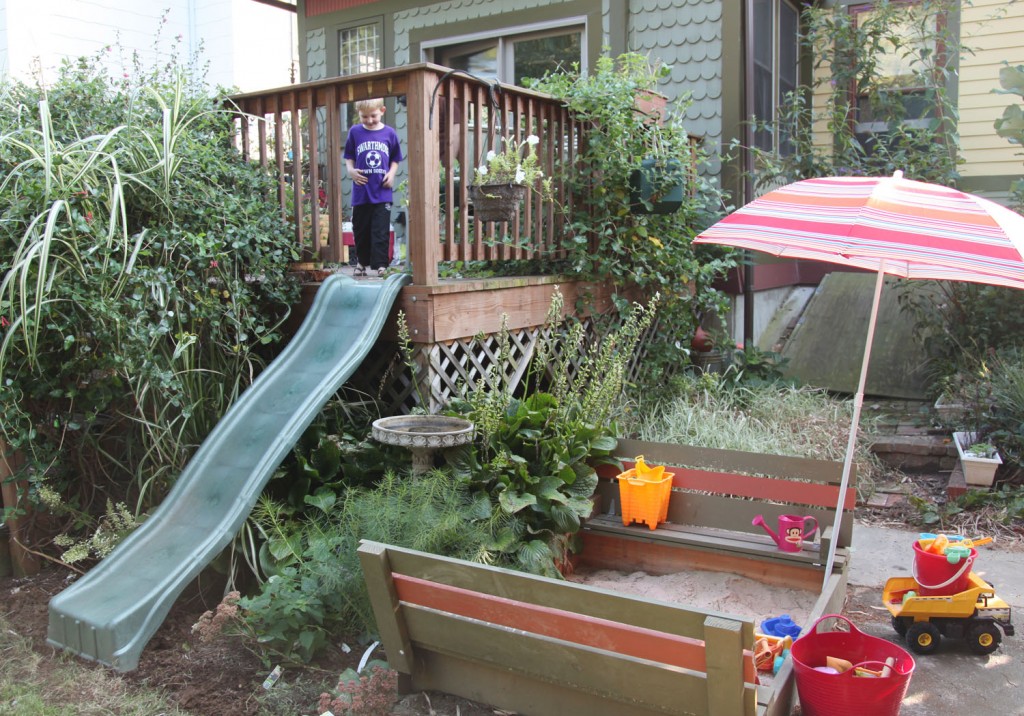
Sam seeing the slide installed for the first time

Well it has been a long time coming, but we finally have a slide set up off of our deck! I first thought about adding this a couple of years ago, since we don’t have space in the yard for a full swing set. This spring I put a plan together and figured out where to put the sandbox and swing. The only component left was the slide. Then I looked and looked on Craigslist, with no luck. Then summer hit and the last thing on my mind was working out in the yard. Well at the end of the summer I got lucky and someone about a block away put a slide out for the garbage. I drove past it and got very excited. We were on our way to a kids birthday party and couldn’t stop. I thought sure it would be gone by the time we got back, but fortunately it was still sitting there. I walked over and found that it was in incredibly good shape and looked to be about the right height! Then I proceeded to run down the block with it like a silly kid.

Sam testing out the new slide

It has been sitting in its new home for the past month waiting for me to get around to cutting the handrail and bolt it in. This weekend I got tired of the kids asking if it was “nailed in yet” and decided to get it functioning while they watched a movie.

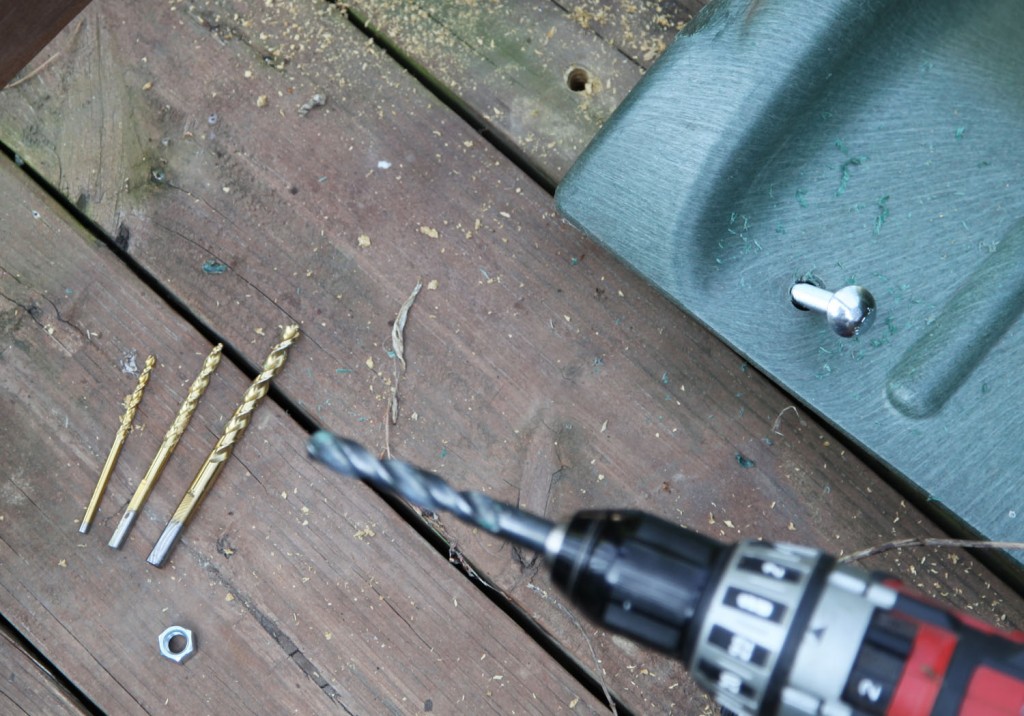
Drilling for the new Carriage Bolts to hold the slide on the deck

The first step after determining the rough location was to determine how I was going to attach the slide. The slide had 2 holes at the top. I decided to reuse these and bolt through the deck. Our decking is 1 1/2″ thick pressure treated wood. This gave us a nice strong material to bolt through. I drilled a small pilot hole at each location to make sure it was a clear shot. I ended up having to shift it over about 1/4″ to miss the joist underneath.

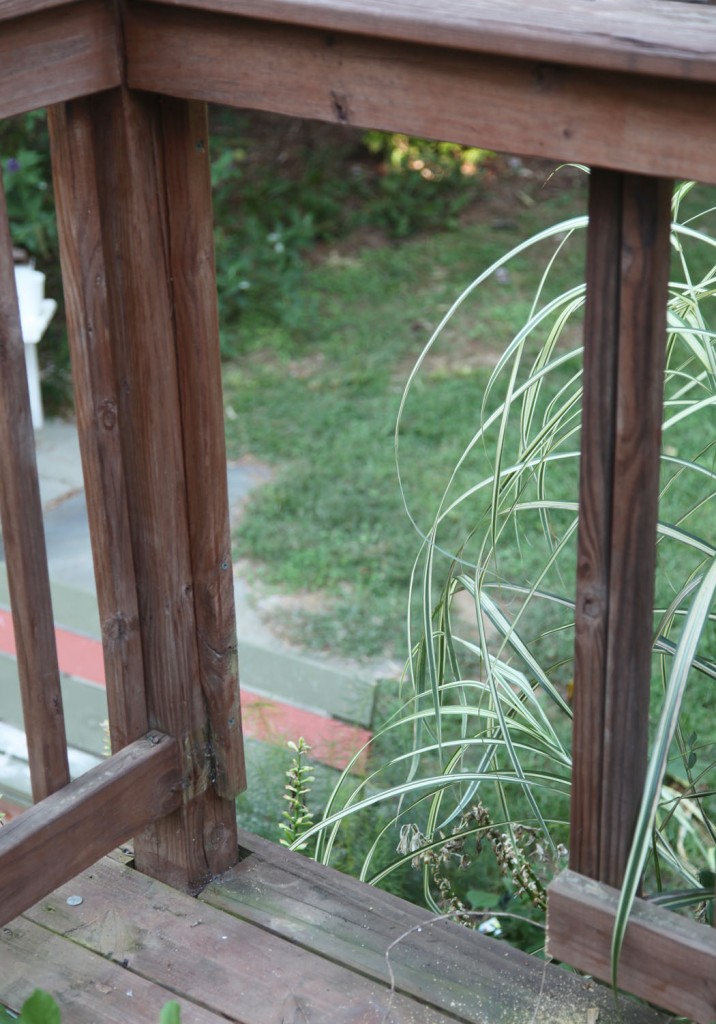
Guardrail after removing the spindles and lower horizontal member.

Next I removed the portion of the guardrail that was in the way. I unscrewed the vertical spindles. Then I took one of them and doubled up the spindles on the freestanding side. Then I used a sawsall to cut the bottom member.

Then I drilled the final larger holes and bolted them in with carriage bolts (the kind that are round and smooth on top). I also used a large washer underneath (to increase the bearing on the wood) and then a locking washer (to keep it nice and tight) and finally a hex nut. I used a 3/8″ carriage bolt. It looked nice and sturdy and I new that the top would cover the slide holes.  I spent about $3 for the bolts, washers and nuts. Pretty good deal!

Finally I had Mr. S. stand on top of the slide to make sure it was nice and tight and I used a wrench underneath to do the final tightening.

Our deck is a little over 5′ off of the ground (a lot of play slides are designed for 5′). So after the top was installed I did a little regrading at the bottom. I also made sure that the bottom of the slide was firmly in the dirt (by about an inch) so that it wouldn’t move.

The slide is definitely a little steeper than it would be on a playset, which makes it extra fast. The kids LOVE it. I think if I had smaller kids I would have added some additional dirt to the bottom.

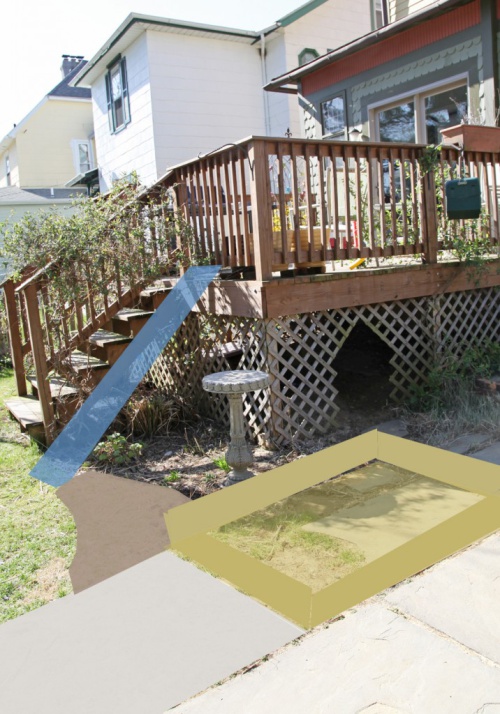
Here is my rendering from this spring:

Rendering of play area from this spring.

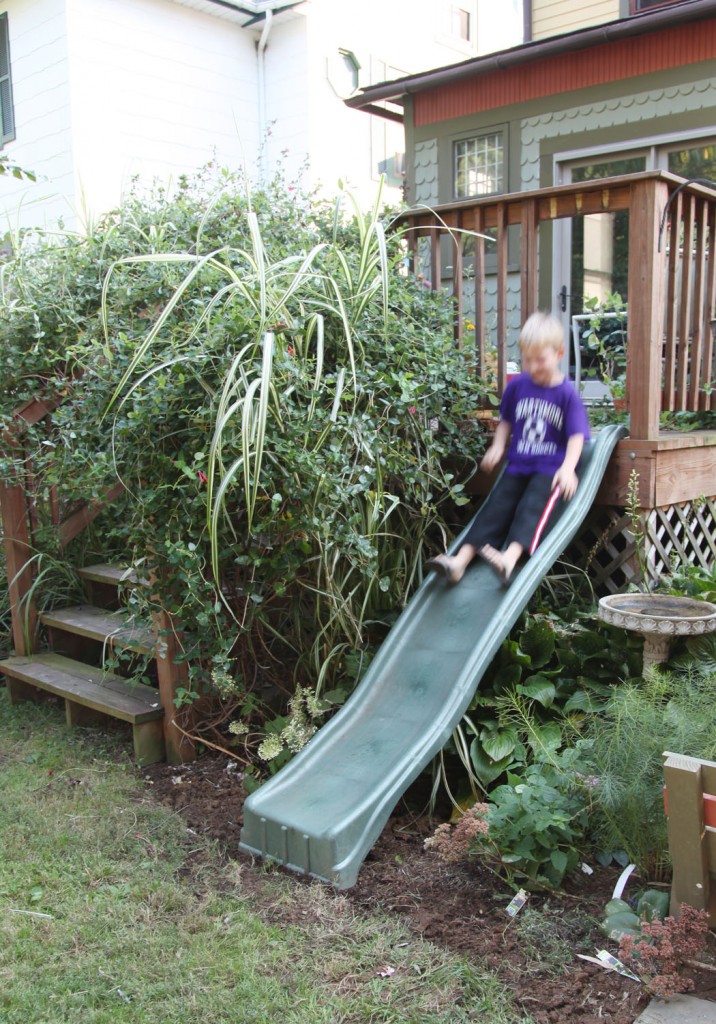
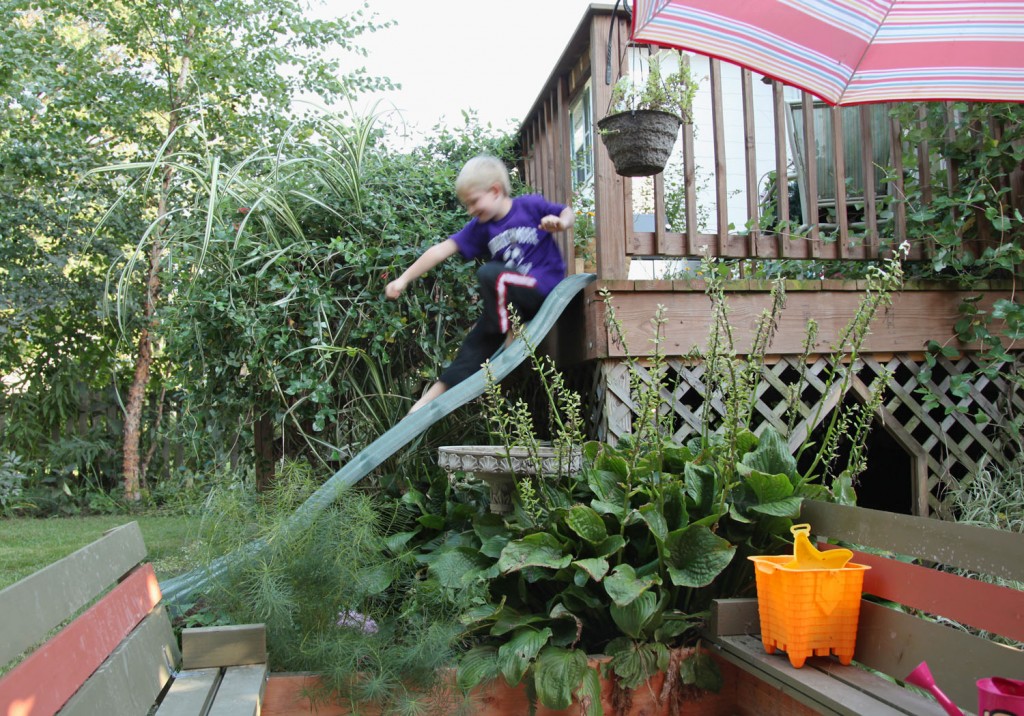
And here is our play area now:

Sam making good use of the “new” slide.

I am pleased to be able to give them areas to play outside without sacrificing a large portion of the yard to swing set. What do you think?

13 Comments

First Peak at the old Heart Pine Floor

We are still adjusting to our new schedule here. Last night Sam had his first night of homework, which I have to say so far is as difficult for us as it is for him. After a long day, we usually want to hang out and have some fun. Instead last night after dinner Mr. S. spent 45 minutes with Sam working with him on his homework instead. By the time they were done, it was time to get ready for bed. Bummer! While they were working on that I had to keep Maisie away, because of course she wanted to “help” too. Phew! To all those parents who told me that it gets harder, you aren’t kidding. At least the kids were exhausted by bedtime and were asleep in 2 minutes flat.

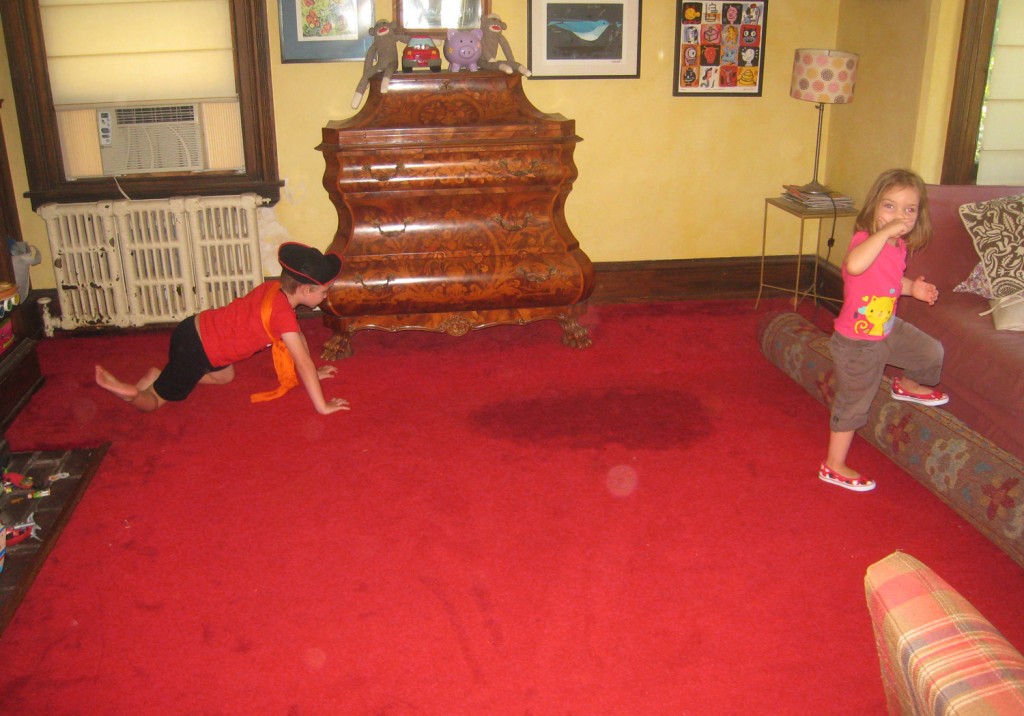
Old Red Carpet (I have no idea where that giant stain came from, it was covered up and not nearly as visible in person)

So after that digression, I have some photos from our last minute weekend project. We removed the red carpet from our Living Room! This was installed by the previous owner (i.e. at least 12 years old). We have been covering up the majority of it for the last 11 years with a large Ikea wool rug, but the edges were exposed.

Living Room Before Carpet Removal (you can see the carpet around the edge of the room)

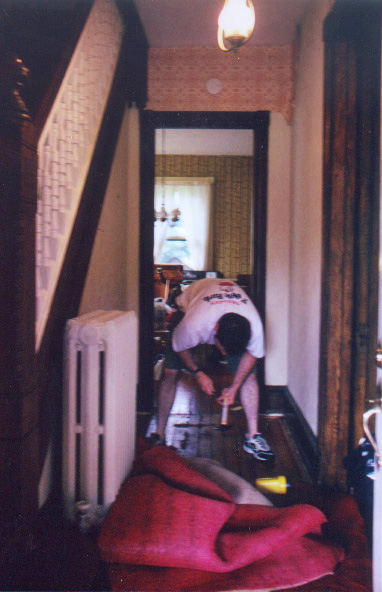
The carpet was actually in the front hall when we moved in as well. One of our very first projects when we moved in was taking that out.

Mr. S. back in 200 removing the padding from the Front Hall. Don’t you love the light fixtures and wallpaper!

Lately one of our beloved (but crazy) cats has decided that the corner of the carpet make a wonderful litterbox (sorry for that visual). Well, it reached the point of no return and we decided to keep Spot and get rid of the carpet.

Spot sitting in the Candy Land box (aka the Culprit)

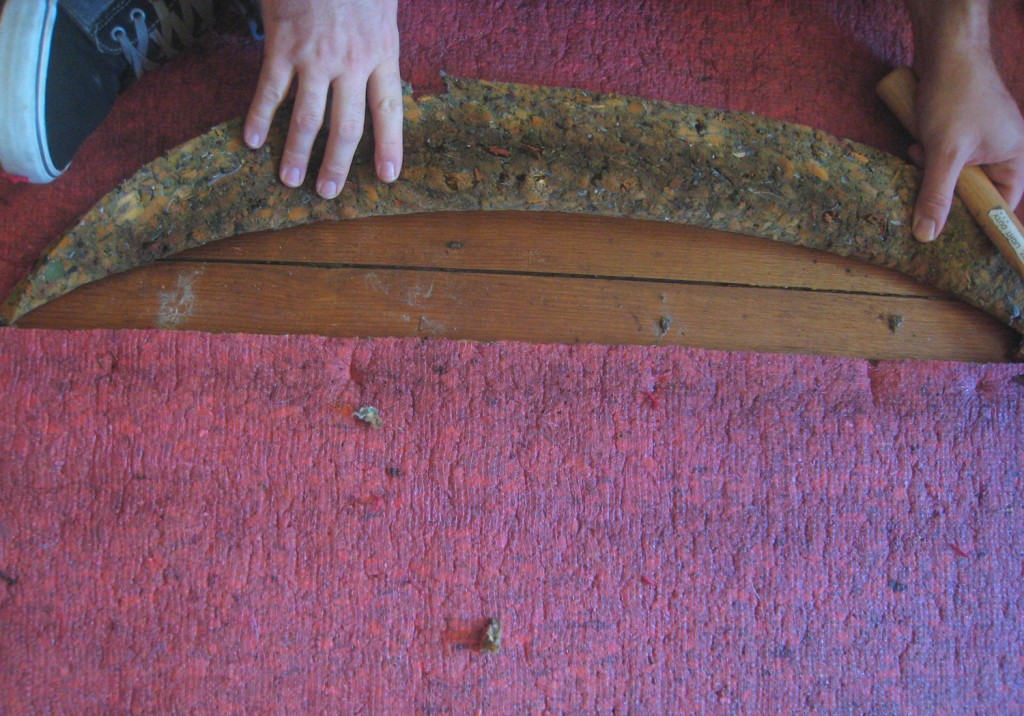
We knew that there was at least one tin patch in the bay window area (which we could see below) but otherwise were not sure what we would find. The floor in our house is also the structure, so it adds an extra element of adventure (and gaps where you can see below). We started by moving the small stuff out and clearing half of the room. We started on the fireplace side and broke it into 3 sections. We have found that it is definitely easiest to cut the carpet into manageable sections and roll it up and tape it for disposal. First we rolled up the carpet. Then we removed the padding carefully, making sure to removal all of the staples as we went. Removing staples is a pain and tedious.

First Section of Wood Floor

Fortunately the carpet came out pretty easily and after a few hours of removing staples and nail strips it was done. We vacuumed as we went with our HEPA vacuum and gave the floor a quick wipe down and tried to remove any residue from the padding. We have 2 tin patches (fortunately currently covered by the sofa).

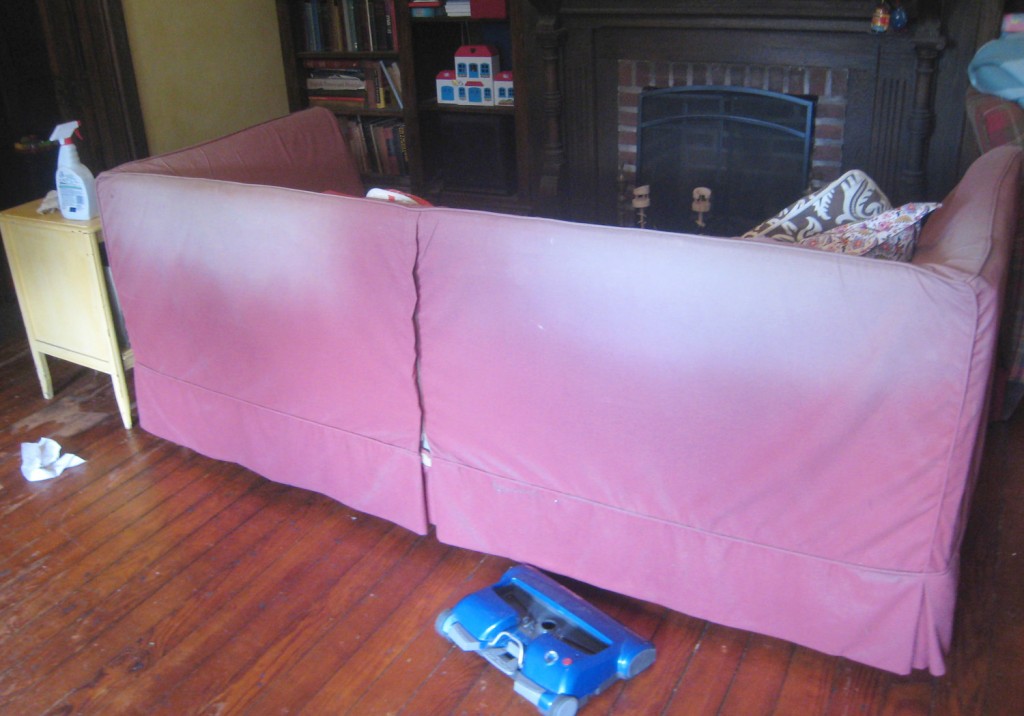
Sunlight damage on the back of our sofa that sits in our bay window. Notice the two rectangles that line up with our 2 front windows (which actually have the shades drawn for the majority of the time)

On a side note this is what direct sunlight does to fabric. The back of our old sofa is now SUPER bleached thanks to the sun. We even have translucent shades that are drawn most of the time. I am thinking that when we finally get a new sofa we will have to get a nice throw to keep at the top to prevent this.

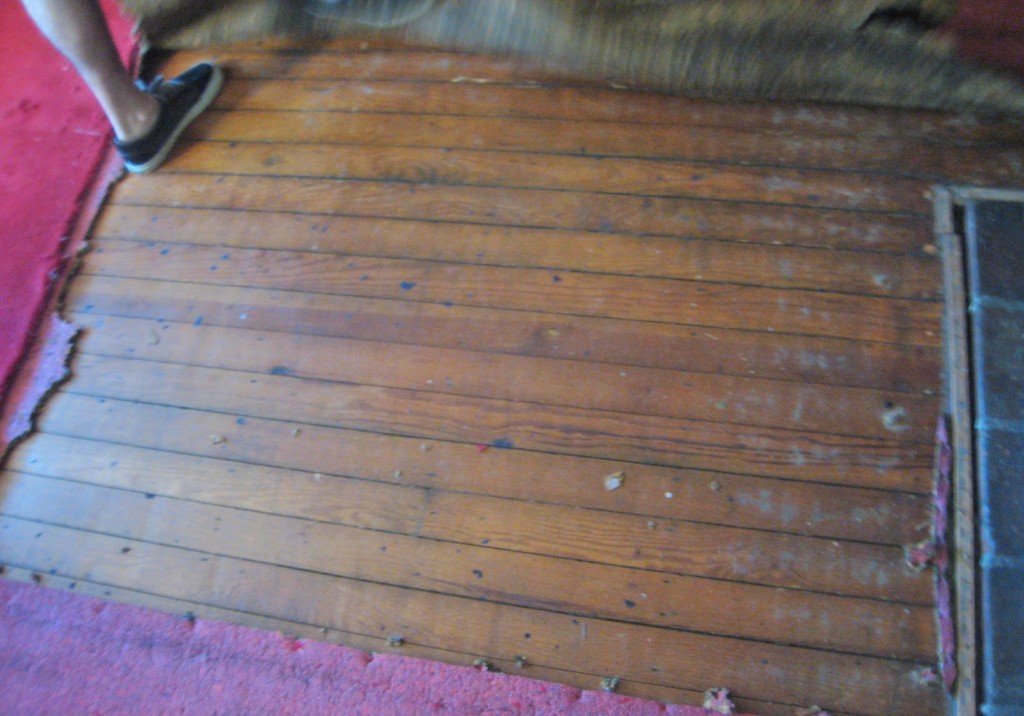
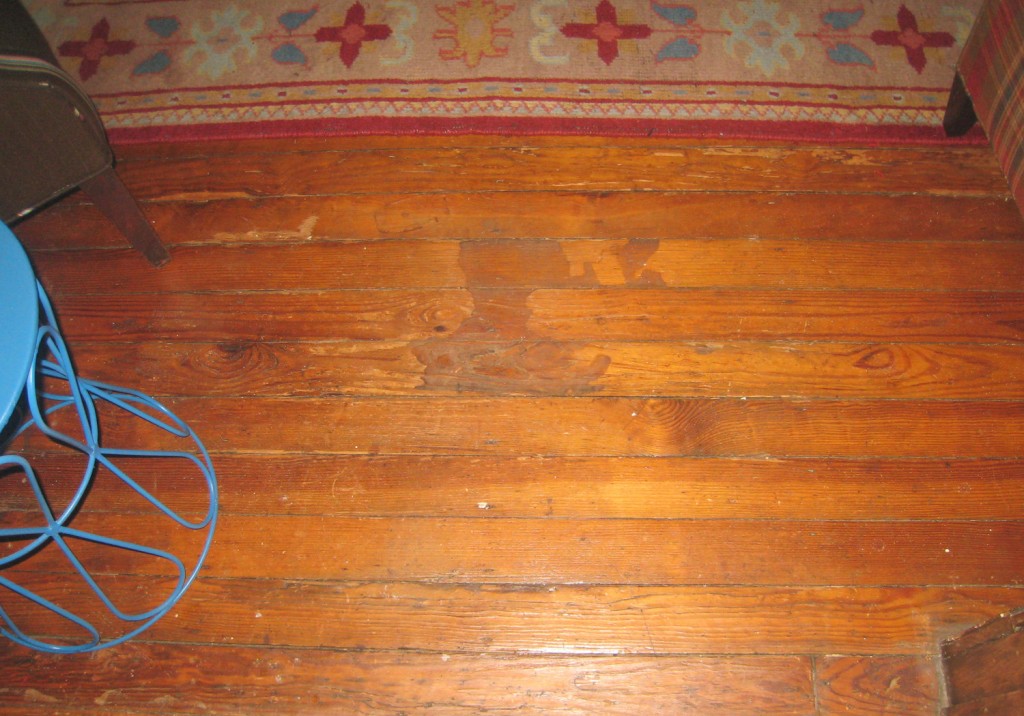
Wood Floor near entry (there is some stubborn residue from the old padding here)

Now that the old floor is visible, it definitely needs some patching (fortunately we have a supply in the garage), which is tedious and slow. It will also need a new finish (which I haven’t researched yet). So I happy that the room is smelling fresh and not so happy with how it is looking at the moment.

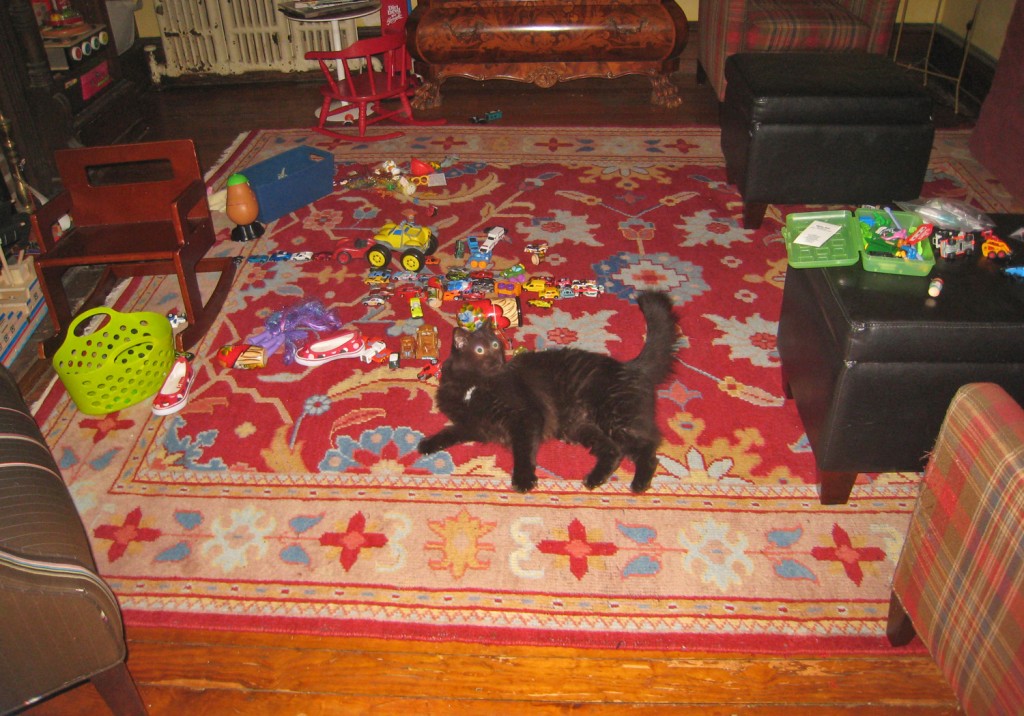
The Living Room Back in Use with Spot making herself at home (the floor was being used as a racetrack)

Fortunately the kids don’t seem to care that the floor is suddenly harder (I need to order a rug pad) and immediately went back to playing on the floor. Here it is a couple of hours later with Spot showing her approval (please excuse her devil eyes).

Has anyone else been busy with last minute projects?

Leave a comment

Burlap Sack Reunited Part 2

September 7, 2012 — 2 Comments

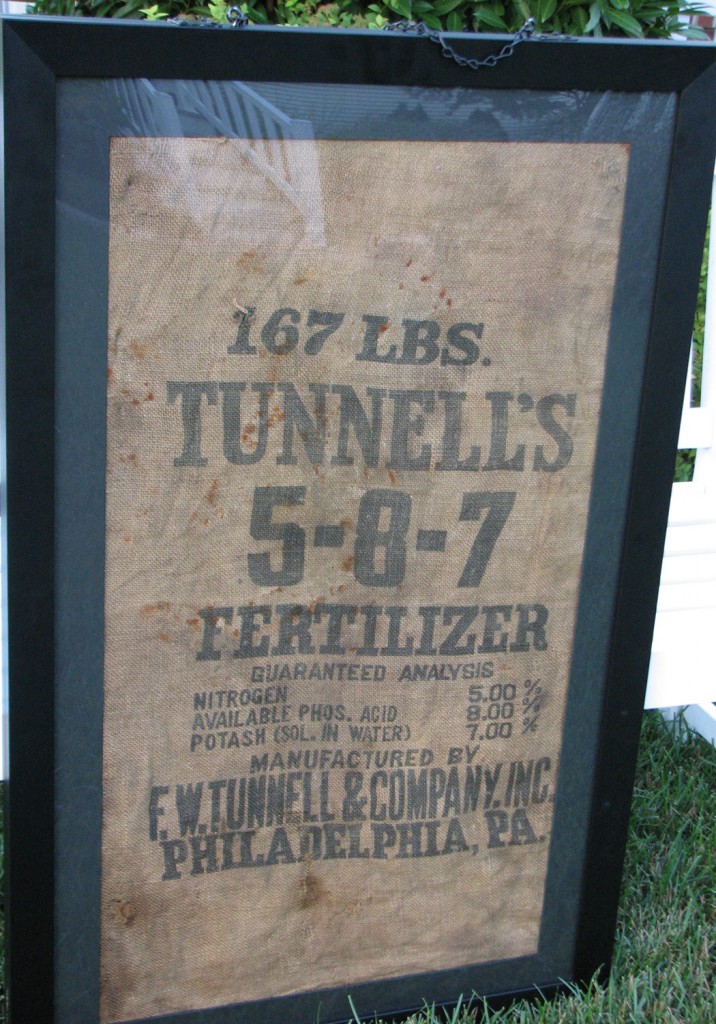
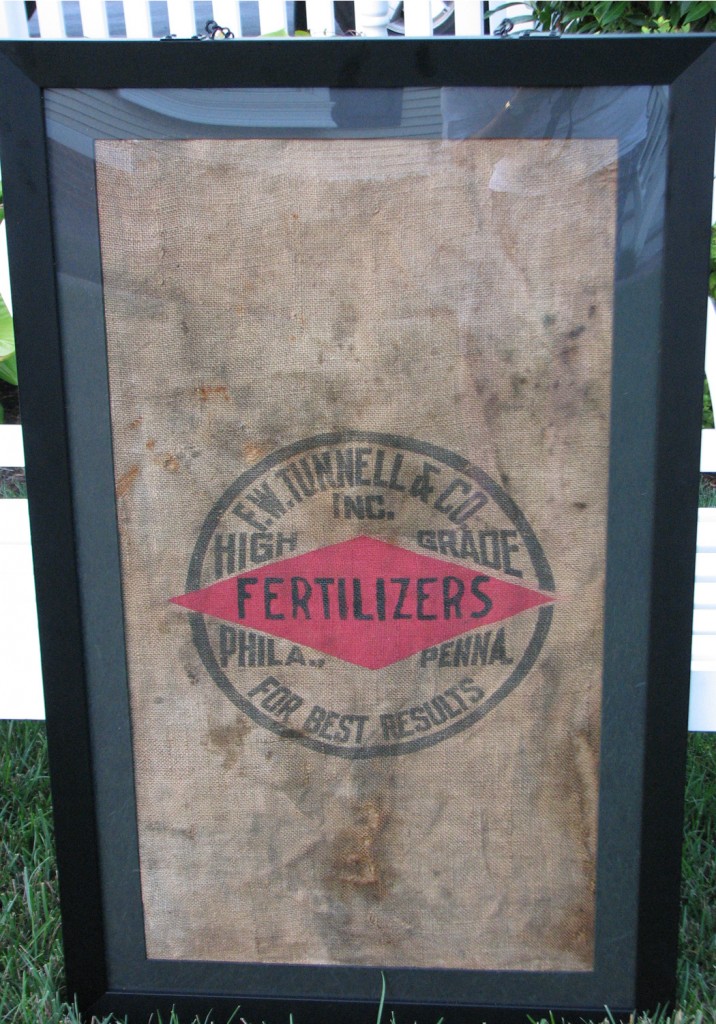
Tunnell Fertilizer Sack

Today I thought I would share the end to a happy story. A while back we found 3 vintage burlap sacks stuffed in the top of the foundation when we were gutting and insulating the basement.  I wrote about them and plans to frame them (still on the to do list). Then a couple of months later I received an email from the great grandson of the founder of the company who made the fertilizer sack. He asked if I was willing to part with the vintage Tunnell burlap fertilizer sack. I gladly agreed, happy to have it return home. He had been searching for one for a long time and was excited to get it framed. Well this week I received an update! They framed both sides of the sack and had the red diamond on the back repainted.

Tunnell 5-8-7 Fertilizer Sack

Back of the Tunnell Fertilizer Sack (with the diamond repainted)

Pretty exciting! It actually cleaned up quite well. Now if I could just get around to framing the 2 remaining sacks. They only have printing on 1 side and the cabbage sack is ripped, so I’m not sure how I am going to deal with that. I think it may require gluing it carefully to a cardboard or foamcore substrate.

Cabbage Burlap Sack

Potato Burlap Sack

I hope everyone has a wonderful weekend! I am looking forward to some time with the family.

2 Comments

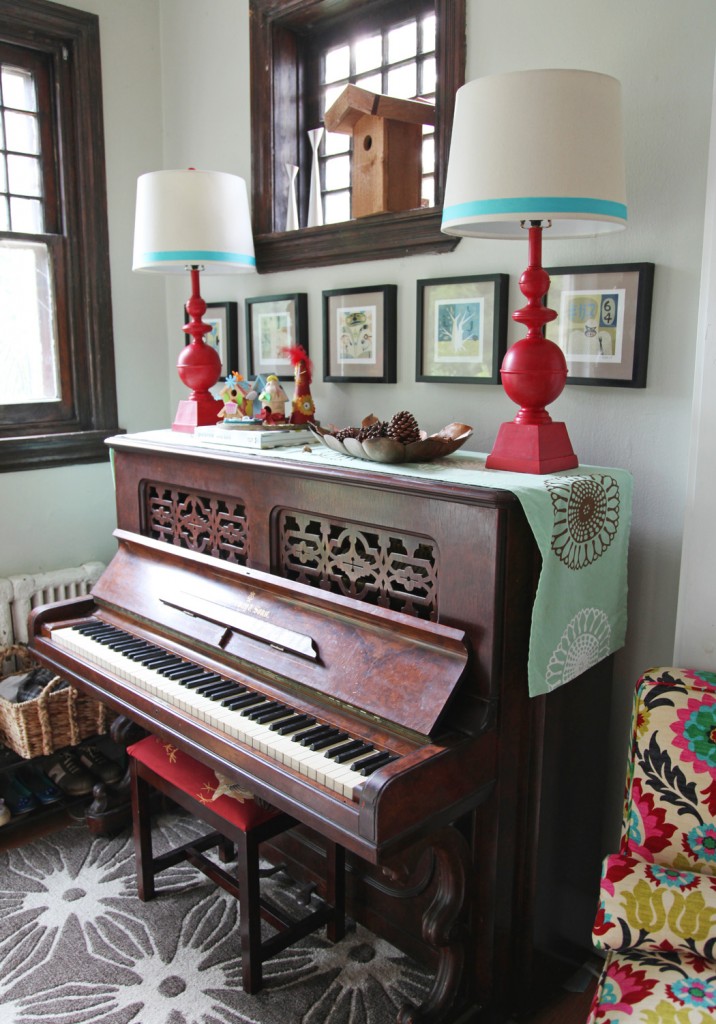
Piano w/ newly painted red lamps and kids artwork

I hope everyone had a good weekend! I have been feeling more motivated the last few days. I’m not sure if it is the cooler weather, the deadline for getting images together of the house or the hint that fall will be here in a couple of weeks, but I am going to try and keep it going for a while longer.

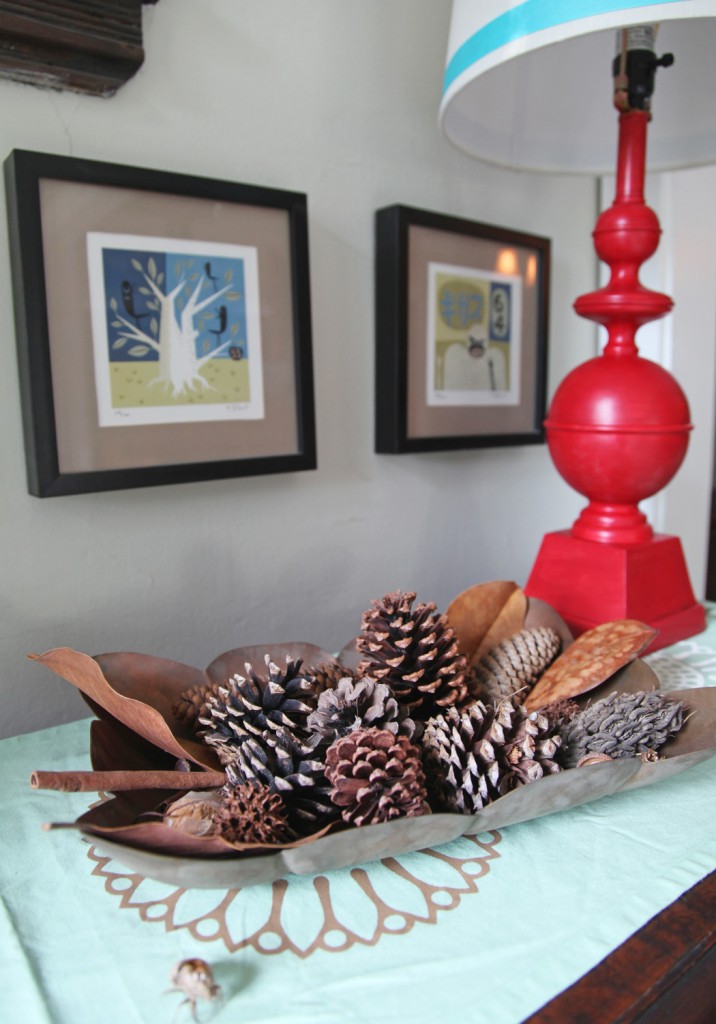
The piano area in our house is a prime candidate for clutter and until now didn’t have anything in particular on top except for one small lamp (which has been relocated to the kids play area upstairs). This landing zone is where we come in and out of the house most days and the area often becomes cluttered with stuff, particularly the top of the piano and the floor space around it. In my quest to make the piano area more polished looking, I bought 2 new lamps for over the piano last week to add some height. Over the weekend I managed to paint them and add ribbon to the lamp shades.

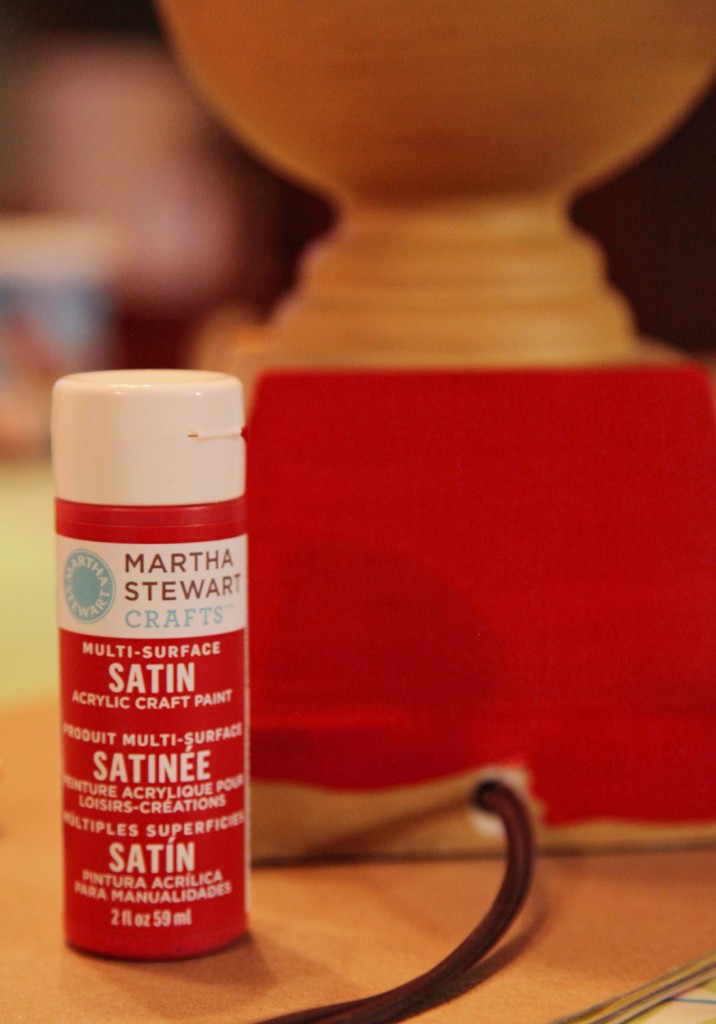
Martha Stewart Craft paint in Tartan Red with a Satin Finish, $2.99

I headed over to JoAnns to see what they had in paint. I was originally thinking that I would use spray paint, but I didn’t want a gloss and the choices in satin and matte were not so good. So I decided to take a look at the craft paint. I liked the look of the Martha Stewart craft paint (in Tartan Red) and decided that for the price it was worth a try. I also thought it might work better anyway because the lamps already had a slight brushed texture to them. Fortunately, the paint went on well in one coat. It was really easy because I just squeezed the paint right onto the brush, so clean up was super easy and I only used about 2/3 of the small container.

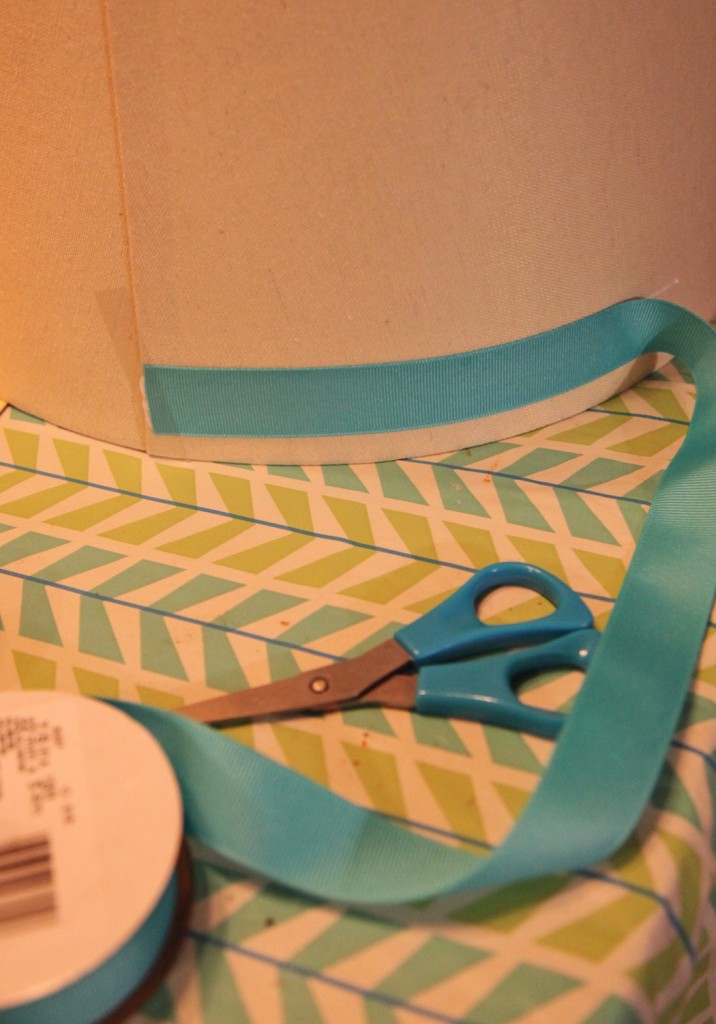
Gluing Grosgrain Ribbon onto the Lamp Shade

I also picked up some aqua grosgrain ribbon for the lamp shades for $3.99. I decided to try gluing it directly to the shade with craft glue (Alene’s Original Tacky Glue). I started at the back and used some scotch tape to hold it in place. Then in about 9″ increments I added glue to the ribbon and pulled it tight. Keeping it tight is key because the lamp shade is slightly smaller on the top then the bottom and it will pucker on the top if you aren’t careful.

Fixing a couple of spots on the ribbon

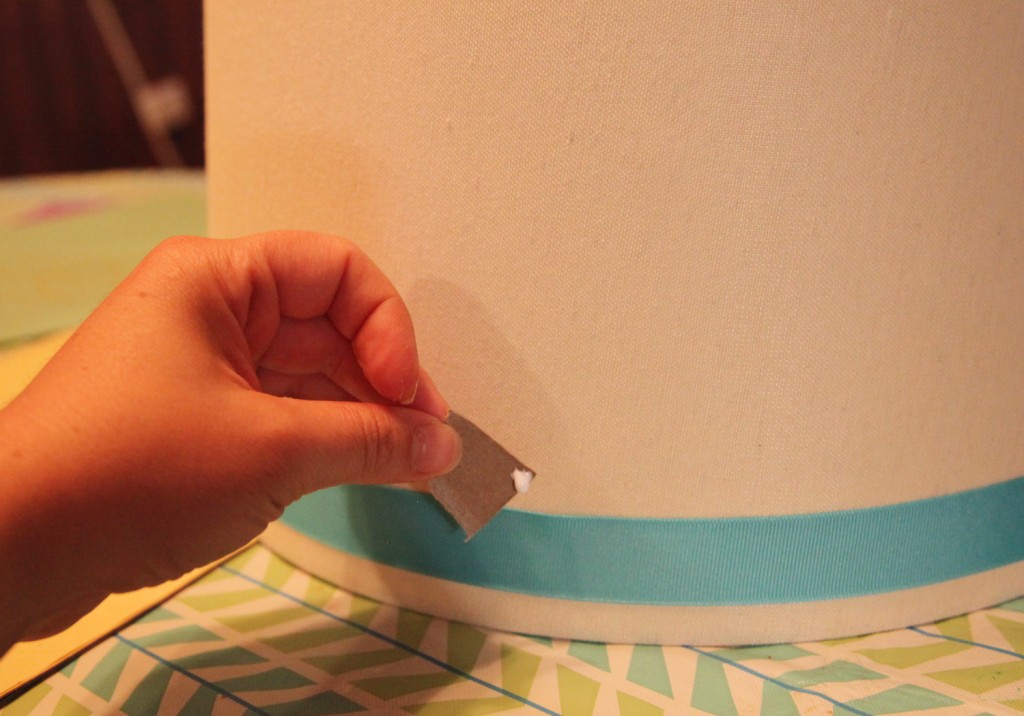
I had a couple of spots at the top where I needed to add more glue. I took a small piece of cardboard and carefully put a little bit of glue in the gap and pushed down with my finger. Then I waited over night and put them back on the piano the next morning.

Piano with new lamps and accessories

So now that the lamps were done it was time to add some more accessories. I started with a table runner by simrin that I bought a couple of years ago. I really like the color and pattern, but find that I don’t use it very often with the kids.

The kids birdhouses and a few of Sam’s treasures from Artcamp

I had already decided that I wanted to feature some of the kids artwork on top. I found an old brass (?) plate that we had and added one of my favorite books (Pattern by Orla Kiely).

Copper bowl filled with the kids nature display (cicada shell in foreground)

Next I  added a copper bowl filled with the kids “nature display”. We let the kids collect pine cones, leaves, pebbles and cicada shells and had been putting them on a small tray that was getting too full. This new bowl works well.

I have also added a new basket (from Homegoods) that sits on the adjacent shoe rack, to hold miscellaneous stuff.

Next on the list is new valances to match the ones in the Dining Room. I sewed them over the weekend, but I still need to pick up the wood and brackets to finish them up.

So far I am really liking the red lamps and new bit of color to this corner of the house. What do you think?

Leave a comment

Basement Beadboard Ceiling Details

The most popular question I get on my blog, is about the beadboard ceiling in the basement. I have promised to write a more detailed post. So here it goes…

I am become sort of a beadboard expert over the years. I didn’t start out this way, but our house is old and already had a good bit of beadboard, and I have had to patch some over the years as well as installing new. Beadboard and wood planking comes in all sorts of sizes and dimensions and range in price from totally affordable to kind of expensive. I’ve used a bunch of different varieties for different uses. In the basement we have used 3 different types.
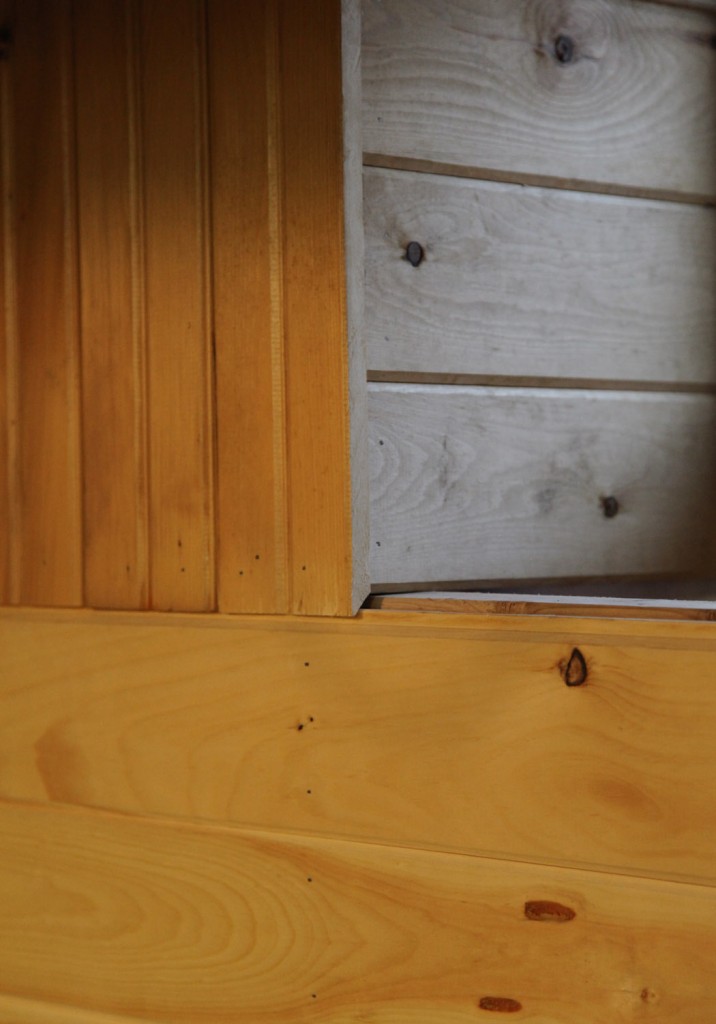
Beadboard Detail at the Window

1. Walls: We used a classic full size tongue and groove beadboard for the walls. This is 3/4″ thick and approximately 6″ wide. One one side there is a “bead” in the middle and on one end, giving you about a 3″ repeat. On the back it is smooth with a simple v-groove at the joint. The basement already had some of this board on the walls, so we actually salvaged what we could for re-installation. The nice thing about this is that you don’t need any backup. This is strong enough to act as the wall surface. It is simply nailed to the studs. This is also what is installed on our porch roof (which is what this type of board was originally meant to be used for). Fortunately Home Depot sells it in 8′, 10′ and 12′ lengths.
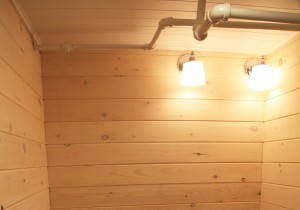
Thin Plank Ceiling in Bathroom. This is permanently attached.
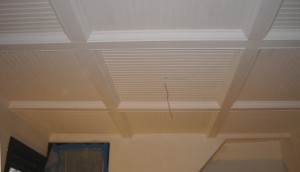
Our Dining Room Ceiling: Beadboard & Beams attached to a plywood substraight

2. Ceiling Option 1: For our Dining Room Ceiling and the Ceiling in the new basement Bathroom we used a thinner beadboard product. It is still tongue and groove but it is only about 3/8″ thick. This will tend to warp, so it usually requires a back up material (in our case 1/2″ plywood). This nice thing is that it is really light weight and easy to cut. These come in shorter length and are packaged in sets. They are available in pine unfinished and white, as both a beadboard and a plank product. For our Dining Room we used the beadboard and for our bathroom ceiling we used the plank. In both cases we went with the less expensive pine and primed and painted it ourselves. However this isn’t a good option for a removable ceiling since the piece are flimsy and have a tendency to warp if not attached to a substraight.

Basement Beadboard Ceiling Details

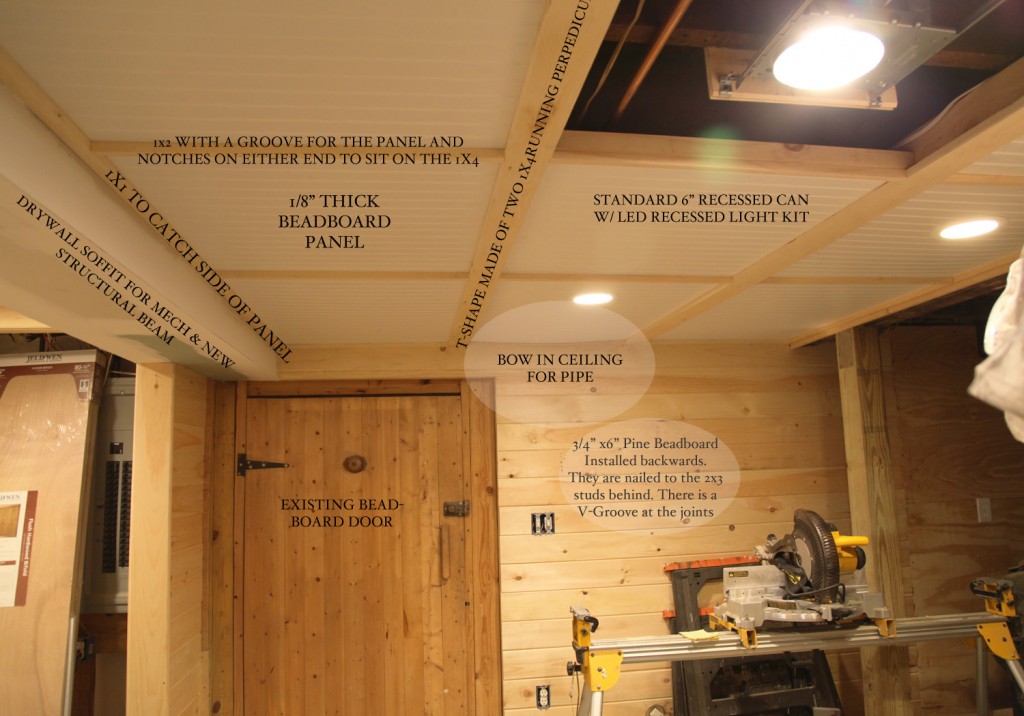
3. Ceiling Option 2: For our removable ceiling we want with a sheet product. This is about 1/8″ thick and is available in a 4’x8′ sheet and primed white. This is easy to work with and inexpensive. However because it is so thin it will tend to sag, so we had to be careful about not making the spacing too large. This also meant creating a “grid” out of wood for the panels to sit in. The nice thing about the thin panels is that it helped us maximize the ceiling height. We even bent one panel about 1/2″ to allow for an extra low pipe.
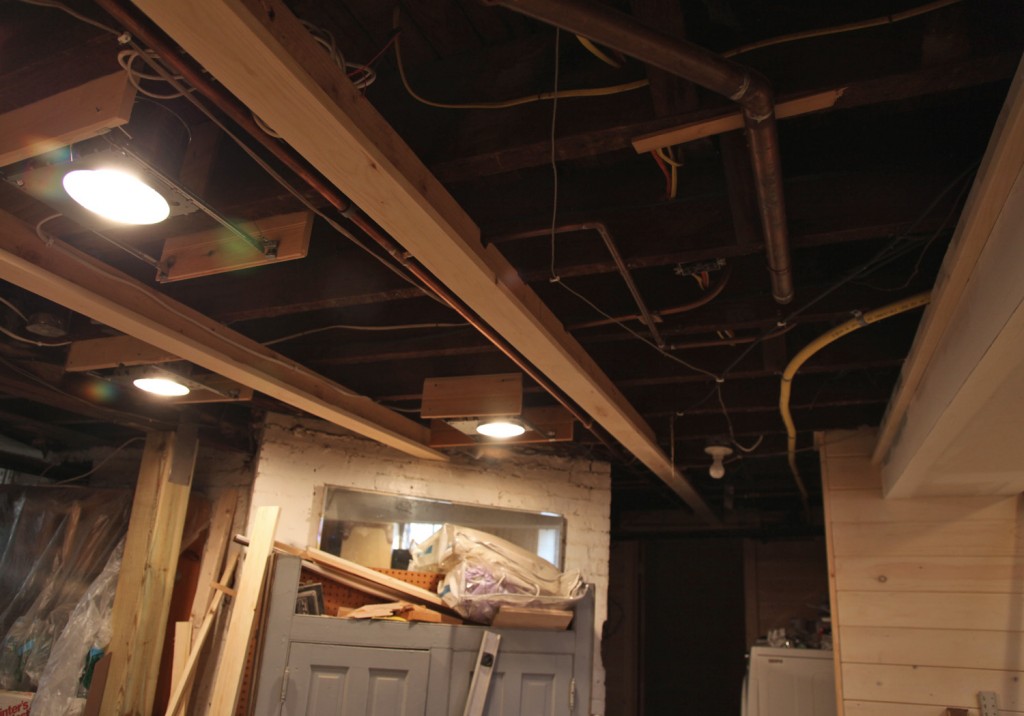
Ceiling w/ T-Shaped Pieces Installed

Step 1:We started by creating an upside down T shape out of 2 1×4 pieces and attaching them perpedicular to the floor joists above. This gave us enough space for the miscellaneous plumbing to fit.

Step 2: Rough in lights as required. We centered our in each “bay” of the ceiling. This took a lot of effort to come up with a pattern. Our ceiling was full of pipes and other obstructions (we are below the kitchen). I stood there for about a half hour with my contractor and a piece of paper trying to come up with an acceptable pattern.
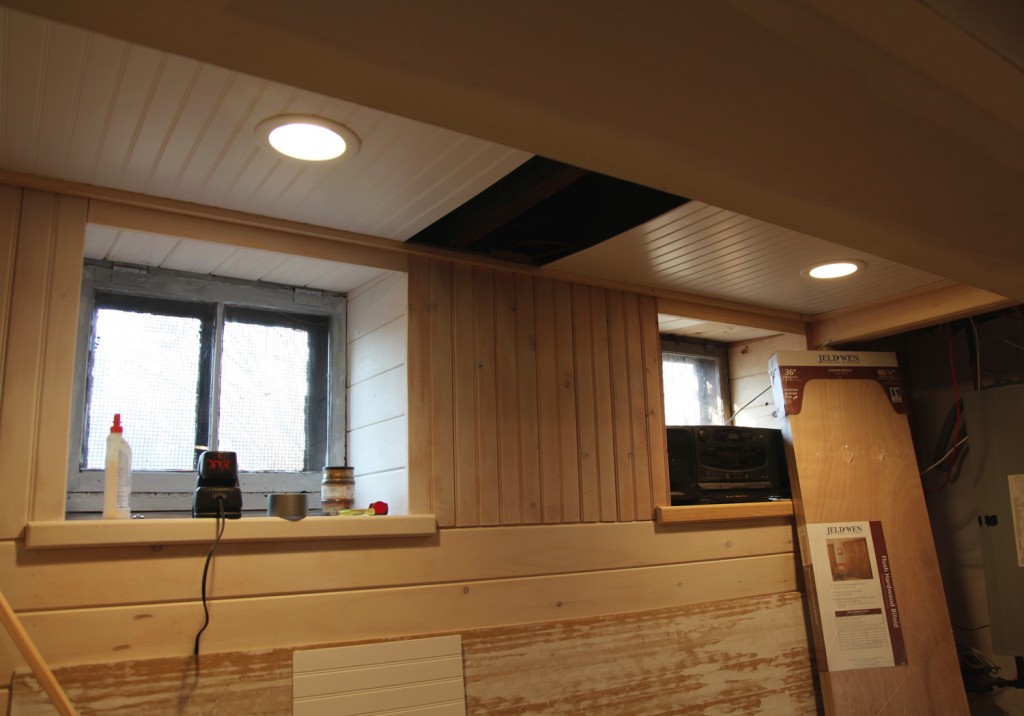
Testing Panel Locations before Installing the Cross Piece

Step 3: Figure out the spacing on the panels and test fit.

Step 4: Install the cross pieces. We used 1×2 with a groove cut for the panel and notches out on either side for them to sit on the 1x4s running the other way.
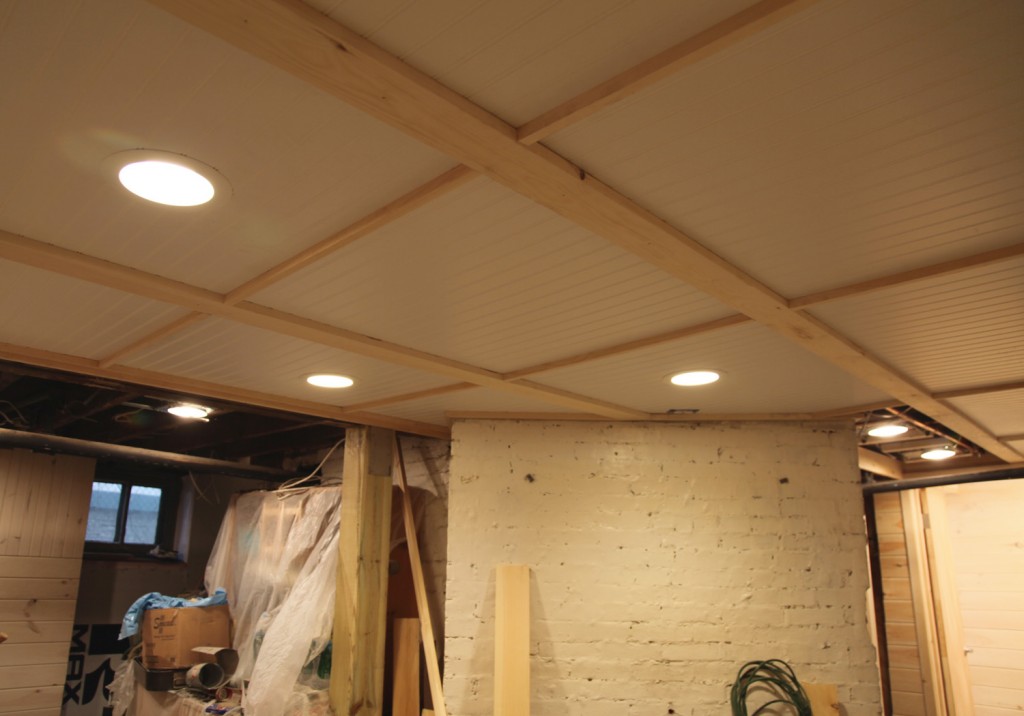
Ceiling Before Painting

Step 5: Install all of the panels. Because everything is pretty snug it definitely takes a little adjusting to get them into place. We installed the ones with lights first,since the trim piece goes over the panel.  I have to say that it is kind of pain to move them, but I don’t plan on doing it very often (maybe once a year to tops). The one advantage I do see is that if I get a leak above (i.e. the dishwasher) it would most likely only require taking 1 panel out.
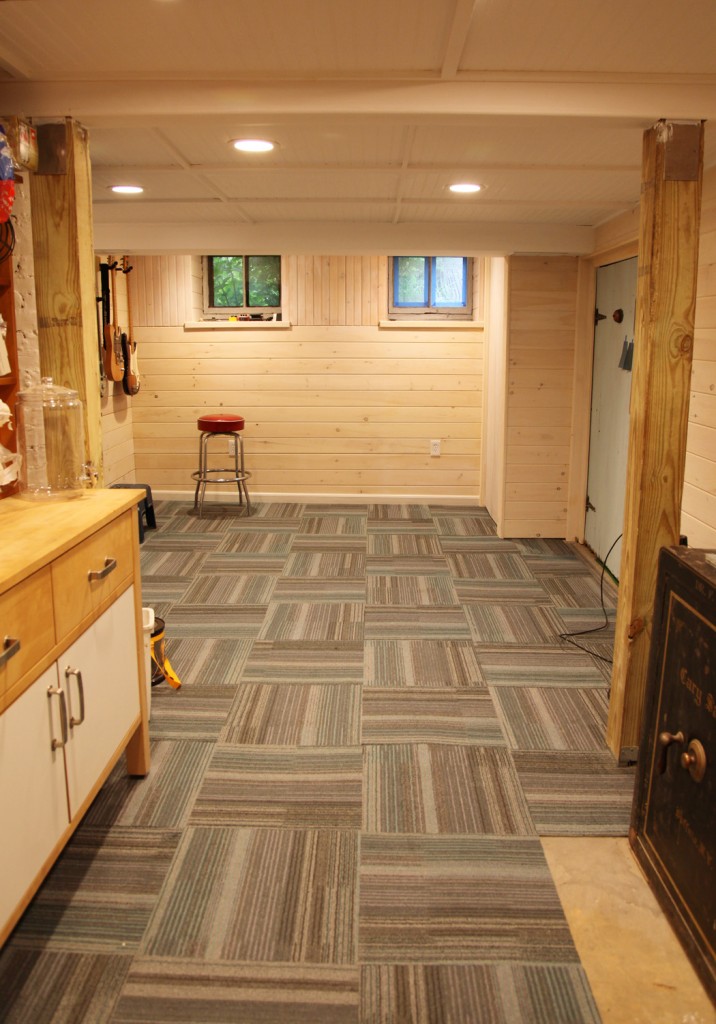
Finished Ceiling

Step 6: Paint. Okay so I should have painted the frame before putting the panels in, but I didn’t. Oh well. I really like how it came out.

Cost: I have also gotten several questions about cost. The materials themselves were not very expensive for this ceiling. Most of the cost is in the labor, for installing the upside down T-pieces (while dodging pipes), cutting the panels to fit and making the cross-pieces. It is also pretty slow going! If you are up for doing it yourself and you have the time, I think it is worth it. Paying for a contractor to do it, is definitely not cheap though.

More Questions? Just add a comment and I will do my best to answer them.

15 Comments