Archives For -Victorian

We have almost all of the original 123 year old interior door hardware in our house and it is showing its age. We have a reoccurring problem with the hinges, the doors staying shut and the door rosettes breaking. We have done some piecemeal work, but we need to look at the doors as a group and make a decision on what we are going to do. We have 5 regular doors, 4 of which need work (one for each of the 3 bedrooms, one to the basement stairs and one to the upstairs bathroom).  We will also be moving the door to our bedroom about 7″ so that will have to get worked on no matter what.

Door Hinges:

Note the area where the screw have failed in between the door casing and the door frame. This area required quite a bit of fill

Door frame after wood plug is installed

Hinge after "fix". One screw was stripped so it was replaced with a modern brass screw

Special Tool for Installing Wood Plugs into stripped holes

Hinge w/ additional screws

3"x3" cast iron replacement hinge


Our Door Hinges are simple 3″x3″ steeple hinges (small by modern standards). Many fancier Victorian houses had more elaborate hinges, sometimes referred to as “Eastlake” style.  I don’t mind ours except for the fact that the placement of the screw holes is very problematic. The holes would be much better if they were closer to the edge. In our case the outer screws end up not into the door frame blocking but in the gap in between the blocking and the trim/casing. I have fixed several of these, but because of this condition it is almost impossible to get a good hold. On one of the doors upstairs the previous owner added screws into the corner of the hinges. They did not do a particularly good job of this, but it is worth considering, over replacing all of the hinges. The only new 3″x3″ hinges that I have found that meet my general requirements are cast iron hinges from Charleston Hardware Co. What are my requirements? The hinges must stylistically match the rest of the hardware, the pins are removable and the screw placement needs to work with our door framing. I made the mistake of buying non-removable pins when I replaced the hinges on the front door and I REALLY regret this.

Wooden Door Knobs:

Wooden door knob and rosette w/ worn casing

Painted Wooden Door Knob, Rosette & Key Hole


The interior doors all have wooden door knobs (except for the bathroom). At first I thought this was really unusual, but now that I am a lot more familiar with Victorian houses, I have found that at least around here it was fairly common to have wooden door knobs. Many fancier Victorians would have had bronze door knobs with elaborate details. I quite like the feel of our wood knobs. However 2 sets of these were painted and 1 set  was replaced. A couple of months ago I managed to find 3 sets on ebay for a good price, so I bought them and they have been waiting for installation.

Wooden Door Knob Rosettes:

Currently we have wooden door rosettes & key hole escutcheons (with the exception of the bathroom door which must have been replaced in the 1920s or so with a glass knob and metal rosette). I have yet to see another house with wooden rosettes (I am guessing that most of them broke a long time ago).  In case you are wondering, the rosette or escutcheon plate is is the piece that keeps the knob in place, located directly behind the door knob. Often called back plates, the type we have is typically referred to as rosettes because they are round. If you are searching for replacements, it is good to do a search for door rosette, backplate and escutcheon. Most of our door rosettes have split, which leads to the door knob always being loose. This is exacerbated by the screws holding the hinges in place failing causing the door to settle.  I am currently considering several options for the rosettes, both vintage and reproduction. I still haven’t found keyhole escutcheon covers that I like, but since this is mostly cosmetic as I don’t have the skeleton keys for the doors I am not in as big of a hurry to find these. I find that many of the reproduction patterns for door hardware aren’t as crisp as the originals (which really bothers me).  Here are the ones that I am currently considering. Again these are typically listed as antique/reproduction bronze Eastlake door rosettes. The price on these vary quite widely. These 3 are all pretty reasonably priced, although if I go with the antique ones I am going to have to see if Charleston Hardware Co. will sell me the screws that I need (ones that are the right size and not too long so as not to hit the mortise locks which we are not replacing).  All of these are about 2″ in diameter and should work with the wood doorknobs. They also all have daisies on them, which are my favorite flower and match the daisies on the Kitchen mantel and the upstairs stained glass window.

Restored Antique Door Rosettes, $14.00 each

Un-restored Antique Door Rosettes, $55 for 6

Reproduction Door Rosette, $4.95 each

3 Comments

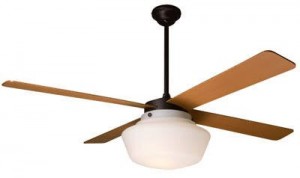
Victorian/ Vintage Styling

Simple Retro Design Fan, Barn Light Electric $500

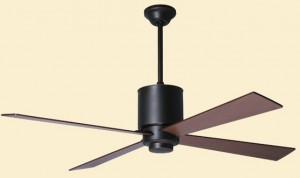
Art Deco/Victorian Fan, Barn Light Electric $440

Clean Lined Retro Styling

Simple Retro Clean Lined Fan, Period Arts $328

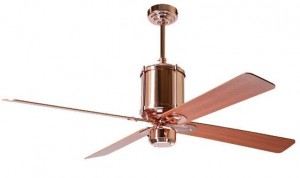
Retro Industrial Copper Fan, Barn Light Electric $349

Industrial Retro Styling

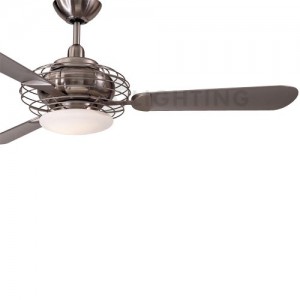
Retro Industrial Fan, Y Lighting $369

Industrial Double Fan, Y Lighting $499

It is hard to find an attractive ceiling fan!  I know a lot of people who just remove them so that they don’t have to look at them. Our bedroom tends to get stuffy in the shoulder season and I hate to use Air Conditioning when I don’t have to. The room faces due south so it tends to be several degrees warmer than the rest of the house. So we definitely NEED a ceiling fan for our room (and eventually for the kids’ rooms too). Fortunately there are several companies making more attractive ceiling fans now. These are a few that we are considering. This decision is important because it is going to dictate what direction of a lot of the other accessories and furnishings in the room. If we go more Victorian it will be in contrast to the Best Panels. If we go more industrial it will go more with the styling of the Best Panels and be in contrast to the structure of the room.  I’m currently leaning towards more industrial. I also want it to have a light attached, which rules out some of the options.

What do you think? Do you have any suggestions?

Once I decide on the fan, I am going to choose the handles for the closet. I am also currently narrowing down fabric for the windows. Stay tuned.

Here is the previous post on the closets.

Here is the original post with the Best Panels.


3 Comments

Existing Closet Wall

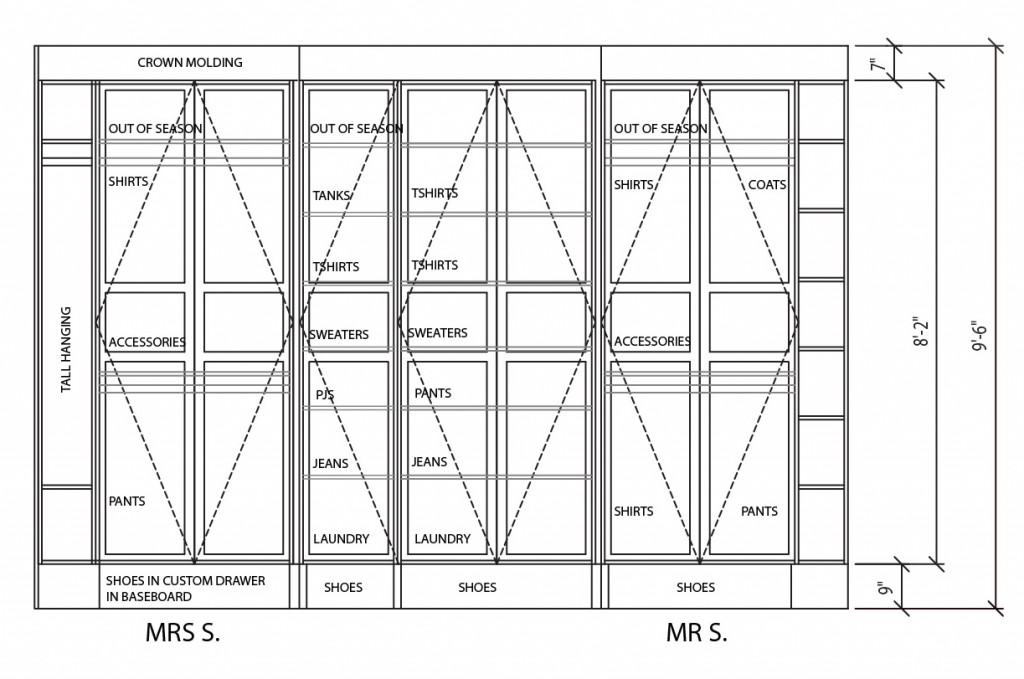
Closet Elevation w/ Clothing Locations shown

Second Floor Plan


Alternate Closet Layout that keeps the door in its current location

The Closet Units:

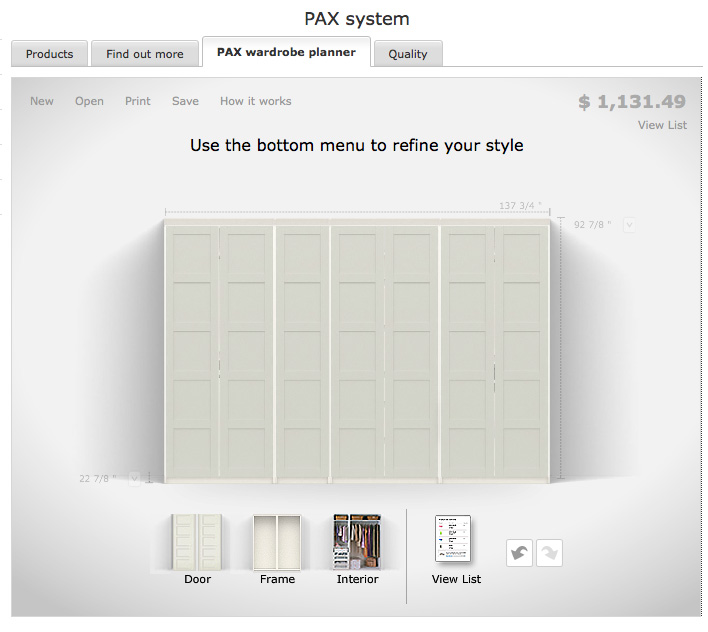
Trying to determine the best way to fit closets into our bedroom has been difficult. I think I’ve done about 8 options all together over the last year. I pretty quickly decided that we should use the Ikea PAX system as the basis for our system. Not only are these relatively inexpensive, but they offer a LOT of options for shelves, drawers and boxes. We should be able to maximize the interior space of these units with the accessories that are designed to fit perfectly into the spaces. We considered custom doors, but in the end decided to use the PAX standard 20″ wide doors, which means using the 20″ and 40″ wide units. These units come in 2 depths and 2 heights. Because we have tall ceilings we could use the taller height, and still have space left over.

We will be using both available depths for the closets. The deeper units will be on either side for hanging clothes. The shallower units will be in the middle for folded clothes. We have gone bath and forth about which depth to use for the middle units. In the end I don’t want to lose the extra 10″ of depth in the bedroom. I am hoping with the double stacked hanging rods in the side units that we will be in good shape with hanging space. We currently fold a lot of our clothes, but I think we will able to hang more of our pants in the new scheme.

Similar Base Condition in Living Room

The Base:

To maximize the usable height and create more of a built in look we are going to sit the IKEA closets on a base. The base will be made of 2x8s and we will try and reuse the existing wood base for the face. So as not to waste any potential storage, we plan on making hidden drawers in the bottom. I haven’t designed all of the details for this yet and part of this will probably be decided once we finish demo and determine the floor condition. We will either use heavy duty drawer tracks or casters on the bottom (with slots to keep them straight). I will probably also add some handles (so they won’t look completely hidden). We installed a similar base detail (without the drawers) in the Living Room.

The Side Units:

On either side of the main closet units we have some left over space. So as not to loose any potential storage, we are planning on making custom boxes for these locations. These will be made out of MDF sheets. Since we don’t currently have access to a table saw, I will draw out the cuts on a 4×8 sheet and send it over to the lumber yard. Most good lumber yards will cut down the sheets to specific dimensions for a reasonable price. This makes transporting the pieces much easier and makes my install quicker. We will paint the mdf white to match the rest of the system (ideally before assembly). I have considered adding doors to these, but given how narrow they are I don’t think it is worth it. I could always add some later if they it looks out of place. I would make those out of 1/2″ mdf as well.

Similar Crown Molding in Living Room

The Crown Molding:

For the top I think we are going to fill the leftover space with painted mdf and install crown molding. I am leaning towards replacing all of the crown molding in the room (since we will be adding new drywall to the ceiling) and it will all need to be removed. Then we can use something similar to the crown molding in the Living Room and Dining Room.  I may reuse the crown molding elsewhere in the house.

To see Part 1: For Our Bedroom Part 1: The Goals


1 Comment

Our Current Bedroom

MS Paint Swatches

House Industries Letters

Happy Summer Print

I don’t know where to start. Our bedroom is in need of some love and a LOT of storage. I originally had planned on doing more work on the room a few years back when I was pregnant with Sam. Unfortunately, I ended up on bedrest the same day we picked up our bed from the store. Then I had to stare at the purple walls for several weeks straight. Ever since, I have been dreaming of the day when we could redo our bedroom to make it more suitable and pleasant to spend time in. Until now our room hasn’t been a big priority, kids spaces have definitely taken precedence, but we have hit the tipping point. I dream of a restful place with a beautiful closet with a place for everything. Hopefully we can this project finished by sometime this fall! This is the first “big” project we have undertaken in a while. We will have to see if we are up to the challenge of doing a good bit of the work ourselves.

The Issues:

Clothing Storage:

For some reason Victorians didn’t seem to need a lot of clothing storage, particularly any requiring a regular length hanger.  Currently the only closet in the room is super shallow, only fitting  a regular hanger where the door is located. There is a niche behind the door that we have installed a rack on for Drew’s shirts and put a hamper below. We have been muddling along (and using the kids closets). Well I think the time has come to deal with this!

The Purple Walls:

I painted the purple walls 10 years ago (to replace horrible wallpaper that use to make me dizzy) and we are in desperate need of a new color. I think we have decided on a new light gray color (after having a dark gray sample on the wall for the past 4 years).

The Plaster Walls:

We have the original plaster walls in most of the house. The condition of these walls varies dramatically. The cracks in the walls between the hallway and bedroom are horrible, and the plaster needs to come out. Also the ceiling needs to be covered in drywall (lots of spider cracks).

Lighting:

There are no hardwired lights (or fans) in our room and the overhead light in the hallway is actually run from a wall sconce outlet. This needs to be fixed! Aesthetically I am not usually in favor of ceiling fans, but fortunately there are some more attractive ones out there now. And I dream of having one on a warm night in our house. Eventually I would like to add them to all of the bedrooms in the house.

Furniture:

We have too much of it! This is partially because we are trying to house all of our clothes, but it is really out of hand. Some of it has to go!

My magazine pile (I know I have a problem!) & The kids books

Clutter:

The clutter, not sure what I have to say except it is a major problem. It is a mix of clothes, laundry baskets, toys and magazines. I am not sure how to deal with it. Hopefully we can find space for some of the stuff in the magical closet wall.

Light:

We need more ambient light for general use but we also need to be able to block out the outside light better. A light on the future ceiling fan should help along with some blackout curtains for the windows.

Ikea PAX Closet System with Bergsbo Doors

The Wishlist:

-Giant walk in closet (just kidding!)
-Ikea PAX closets (they have relatively nice white doors and have all sorts of exciting accessories)
-Light Gray Walls & White Trim
-Less Furniture
-Hang Giant Metal Panels behind bed (from BEST showroom and sitting in garage)
-Pretty Ceiling Fan & Light
-Floor to Ceiling Room darkening curtains (on either side of the windows to avoid the radiator)

Things that Stay:

-Queen Size Leather Platform Bed (Very comfy for reading)
-Comfy memory foam mattress
-Bedside tables (designed by BluDot for Target a long time ago)
-Matching pair of white dressers from Crate and Barrel
-Flatscreen TV & cable box (in an ideal world we could live without these, but in reality this is where we watch most of our TV after the kids have gone to bed)
-Artwork (reframed)

Things that Go:

-TV Armoire to be relocated to the basement for future exercise room (Sorry Mom!)
-2 matching ikea shelving units w/glass doors (not sure where these are going to go, possibly Craig’s List)
-Too short curtains and cheap curtain rods
-Clutter (hmmm…. not sure exactly how I am going to deal with my magazine piles)
-Old Clothes (time for a major reduction in clothing). I think it might also be time for seasonal clothing to be stored on the third floor.

Required Construction Work (the down and dirty list):

The work will be done partially by a contractor and partially by us. I need to get a quote for the contractor portion (and decide where we are going to sleep while this happens).

-Shift entry door by 6″ to allow for full depth closet (VERY CAREFULLY since this is a load bearing wall)
-Demo existing closet (YUCK!)
-Demo plaster on walls near door (severely cracked)
-Remove baseboard at closet areas (salvage if possible)
-Remove crown molding (possibly reuse although not original)
-Remove chair molding (not original , pointless and made of cheap looking pine)
-Fix wood floor in hall/bedroom threshold (we have a supply of salvaged wood floor in the garage)
-Add furred out wall on bathroom wall to allow for a pocket door into the bathroom (I have to see how my contractor feels about this)
-Install new electric for ceiling fan/light fixture
-Install drywall on corridor walls (where cracked plaster was removed) including chamfer detail at outside corner
-Install 1/4″ drywall on ceiling (in both bedroom and hall)
-Install 3/8″ or 1/2″ plywood behind future closets
-Install baseboard below future closet areas w/ blocking to allow for large pullouts for shoes
-Install Ikea PAX system above baseboards and blocking
-Install filler pieces/shelves in areas where PAX system doesn’t fit
-Install crown molding on PAX
-Install crown molding in bedroom and hallway
-Paint walls, ceiling and trim (including pine window and door trim).

BEST Showroom by Venturi & Rauch. We have 4 panels from this fascade

The Fun Stuff:

-Install metal panels behind bed with french cleats (cut 2×4). These are off of The BEST Showroom and have been sitting in our garage for the past 5 years or so. There are 4 that make a pattern. More on this later!
-Choose ceiling fan and light fixture.
-Choose ceiling light for the hallway.
-Choose fabric for the curtains.
-Reframe some of our existing artwork in simple black (or maybe white) frames.
-Frame a wedding picture (since our 10th anniversary is coming up I thought this would be nice).
-Pick out accessories for new closet!
-Get a restful night sleep!

Next Steps:

-Confirm Ikea PAX Closet Sizes (they were redoing their offerings a couple of months ago)
-Finalize Drawings in AutoCAD.
-Meet with Contractor

2 Comments

Living Room: Fireplace w/ yellow paint samples at left

Living Room

Living Room: Staircase & Front Entry

Dining Room

Front Porch

I worked with Sarah this spring on the redesign for her upstairs bathroom. Now that it is finished (I know, I still need to shoot the final photos), I am helping her with her downstairs.

Current Issues:

-The Living Room feels dark (partially because the front windows are adjacent to the screened in front porch). There are also no windows on the staircase wall.

-The Living Room couch is very dark (and well loved by Stanley, their cat).

-The narrow screened in front porch makes furniture placement difficult.

-The Dining Room is a little boring and could use a new light fixture and some accents to brighten it up.

-The current Dining Room color is almost exactly the same as the Living Room wall color.

Goals:

-Create a color palette for the first floor, including wall colors and accent colors.

-Brighten up the Living Room.

-Highlight Sarah’s beautiful and eclectic art collection.

-Find ways to use Sarah’s vintage accessories and furniture.

-Look for a new modern, comfy and affordable couch for the Living Room.

-Look for a mirror for the stair wall in the Living Room to help reflect light.

-Look at options for additional Living Room lighting.

-Look for new colorful accessories to complement the spaces.

-Find a new light fixture for the Dining Room.

-Rearrange the furniture on the porch. Possibly add an indoor/outdoor rug or paint a rug on the concrete floor.

Process:

We are still early in the process. We spent a good bit of time trying to decide on a wall color for the Living Room. We looked a series of yellows (both citrus and golden) to try and brighten up the room. None of the selections seems quite right. So Sarah asked me what I thought of using white. I usually reserve white for trim and accent, but I had to agree with her that white might just be the perfect choice! This way her artwork could be center stage and we could maximize the light in the space. We also decided to leave the Dining Room its current green which pairs nicely with the pinky/terracotta walls in the kitchen.

She has a lot of great antiques and vintage items that I think with a little bit of rearranging will look great. She also already has a lot of beautiful artwork, which I think helps make the decision of white walls the right one. The beautiful painting over the fireplace contrasted with the print over the couch is quite nice. She even has another modern print (in yellow) that we can add next to it.

Here is my first round of marked up photos and potential products:

Living Room Mark Up

Stay tuned for more details!

Leave a comment

Yale Ave Facade (try to ignore the badly placed downspouts)

Close up of Dormer

Side Elevation, This use to be boarded up and full of junk

Beautiful Gothic Windows and Oversized Brackets

Slightly off topic today but so it goes. Today we had the ribbon cutting on our SEPTA Regional Rail Train Station. One of my many hats is the VP/Volunteer Architect of the Morton Station Preservation Committee. This is the train station that I used when I commuted into Philly. It is an interesting complex of 3 buildings including an 1880 Passenger Station, and 1890 Passenger Shelter on the far side of the track and an 1880ish Freight Station (it looks like a barn). It is amazing to think that the parts of our house probably came through the freight station!

It has been a long journey! 6 years ago SEPTA tried to knock down the lovely little Passenger Shelter (literally with chains in the middle of the night). Thanks to some concerned citizens we managed to get them to stop (mostly because they didn’t pull a demolition permit). After a lot of contentious meetings and a lot of fundraising and grant writing our little group managed to get enough money to restore the passenger shelter. We thought the main passenger station would probably never get a full renovation. We were trying to raise money to do some stabilization when the Stimulus money from the Federal Government came through and SEPTA was able to renovate several stations! It is nice to see that money actually being used for something I use and that is good for the community. So here it is in all its glory. There are a few things I wish they would have done differently but overall I think it came out quite nice. The orange brick with the dark gray mortar is really stunning!

I appologize for the bad photos. It is 100 degrees here today and I just shot a few quick photos with our little camera. I will hopefully make the local paper later this week!

1 Comment

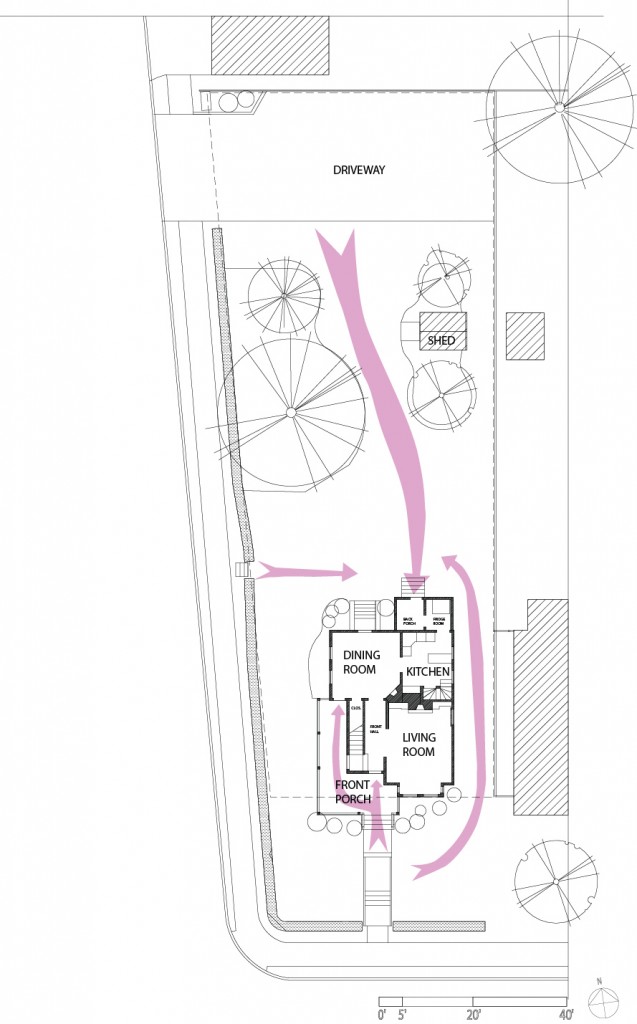
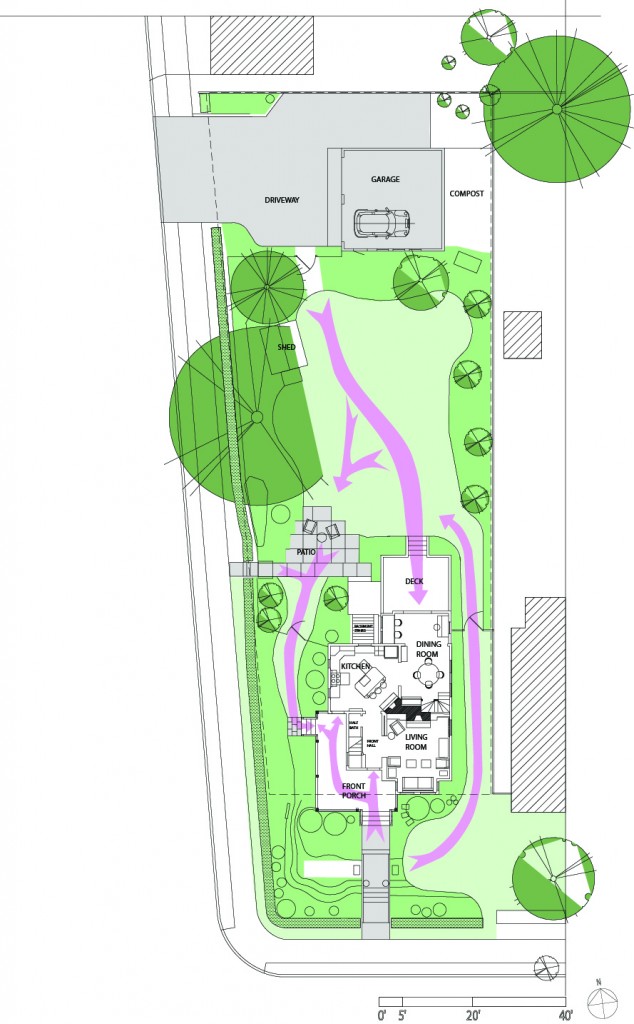
I thought it would be helpful to show everyone the original siteplan and first floor compared to the the current configuration. I also added some arrows to show the connections and pathways through the yard.

House Circa 2000:

-The only landscaping where some overgrown shrubs in the front yard and a large pine tree, dogwood and birch tree in the backyard.

-The Yard slopes down significantly towards both streets. Mr S. wiped out several times trying to mow it.

-The Entrance at the back of the house was not very welcoming or easy to use. Through the back porch and refrigerator room to the kitchen. Yuck!

-The Front Porch was nice, but very exposed to the street and had no side entrance.

-The Kitchen was tiny and the fridge was in an unheated adjacent space. The layout was horrible (it included 3 doors, 2 windows and a back staircase). The connection to the rest of the house was poor. You couldn’t see the backyard from the space.

-The Dining Room was really large, but not very well used.

Current Configuration:

-The landscaping has limited the grass to walking areas and play areas. Lots of perennials, shrubs and trees have been added to provide privacy, add visual interest and to encourage butterflies and birds.

-The House has been opened up to the backyard, providing better light and visual connection.

-The Kitchen and Dining Room switched places, providing us with a large kitchen and a smaller but functional Dining Room.

-We reconfigured the back porch/refrigerator room to be open and have a built-in desk space as well as a space for the piano.

-We added a patio and deck to the backyard to better utilize the space.

-We finally added a second set of steps to the backyard from the porch. Now we can go from the front to side yard and also from the kitchen to the backyard easily. Why did it take us 11 years to do this. hmmm…

Leave a comment

Porch Progress

May 31, 2011 — Leave a comment

Front Porch w/ Honeysuckle (yes the invasive kind)

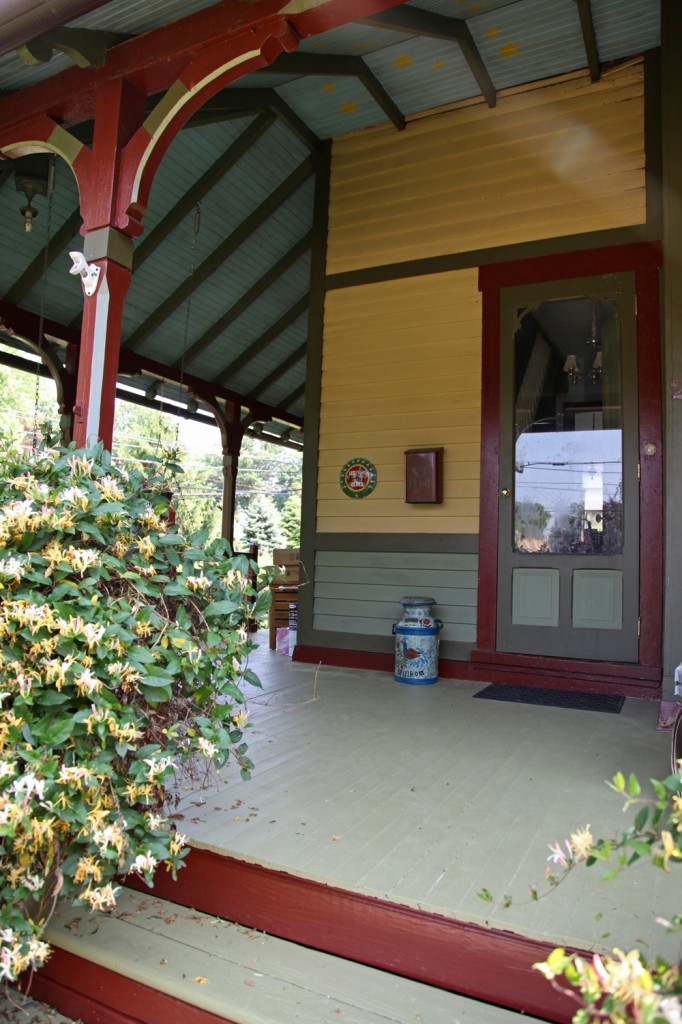
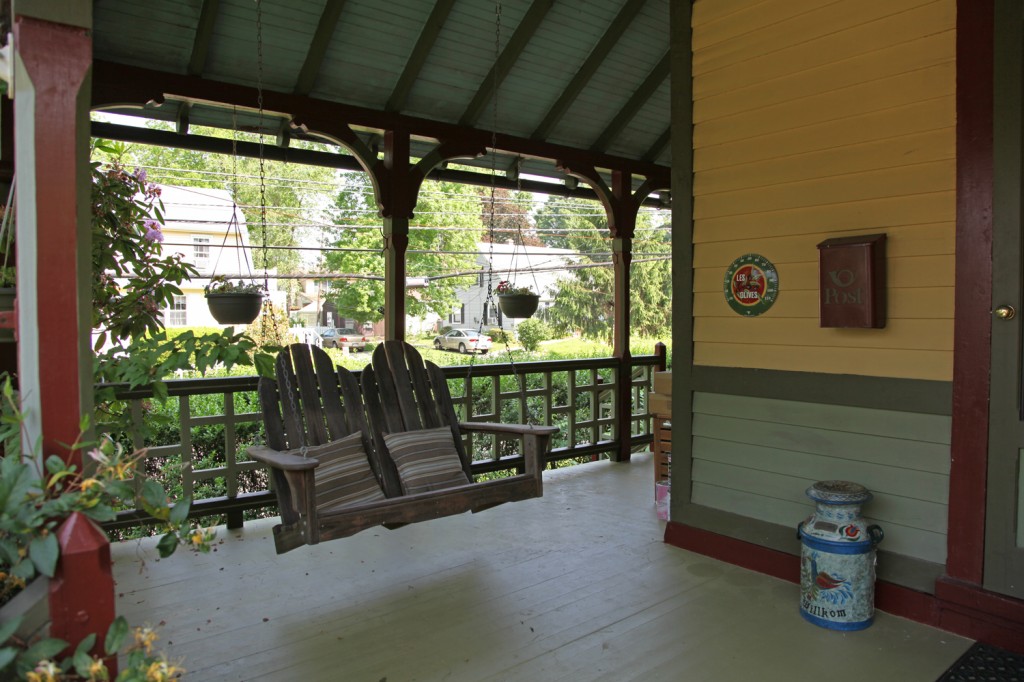
I hope everyone enjoyed the three day weekend! We got to do some swimming (okay it was actually more like sitting in the baby pool) and a visit to the zoo. We also managed to get the porch swing hung in its new location. We have already used it too. We hung it on the low side so the kids could get in and out easily. I still need to paint it and get some new pillow. I am also still deciding on the other porch accessories.

Porch Swing hung in its new location (yes, it does still need to be painted)

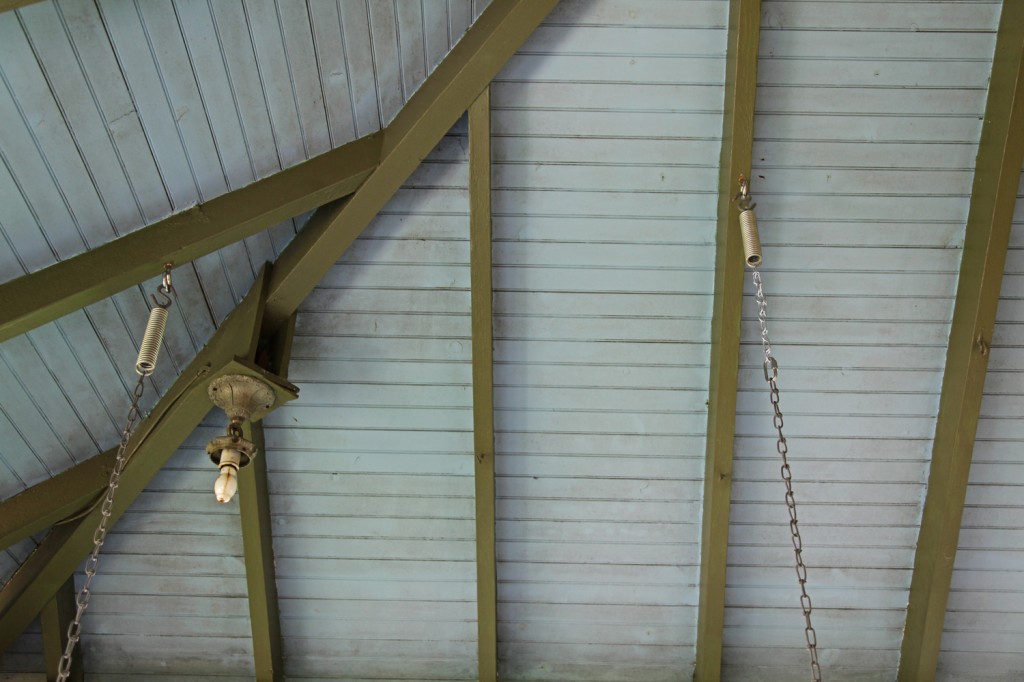
New eye hooks and a chain extension for the porch swing

How to Hang a Porch Swing:

Originally we hung our porch swing on 2 existing hooks (which I’m sure where installed for that very purpose). We decided on a new location, the only problem being that the roof structure is going in 2 directions at this location.

1.Pick up some eye hooks. Note: I went to Home Depot and at first couldn’t find any that would support more than 150 lbs. They all say not to be used for play equipment or for support of people (or something similarly vague and annoying). I managed to find someone who worked there and was actually helpful. He showed me that by the chains (about 20′ further down the aisle) there were some heavy duty eyehooks. I found one that support 350 lbs. It still had the same vague warning but at least looked properly substantial.  I went with 2 of those and 2 connection links that could each support a 1000 lbs. I would strongly recommend eye hooks over regular hooks to minimize the problem with the swing falling off.

2.Decide on rough location.

3. Determine which 2 roof joists to attach swing. The one on the left in the photo was the best location in terms of being out far enough from the rail beyond and avoiding the light. The one on the right was about 48″ to the right (similar to the old location). Our porch swing is about 44″ wide.

4. Pick the first location (in this case the left side). We went ahead and installed this hook. This included pre-drilling with 2 size bits (but nothing too big) and then screwing by hand (it helps to put a big screw driver through the eyehook to give you some leverage). Mr. S’s strong hands installed these pretty quickly. I would probably still be struggling with this step.

5. We hung the chain down and measured out from the chain to the guardrail (yes some good old geometry). Then Mr. S stood on the ladder and moved the other chain around on the other roof joist until the distance the guard rail was the same as the first one.

6. Install second eyehook, the same way as the first.

7. Install the “comfort springs” for our bench on each eyehook. I highly recommend the springs! We ordered them with our swing and they give a nice bounce to the swing when you sit down. The kids also like to bounce on the swing.

8. Hang the higher side of the swing at full length.

9. Adjust the links of the lower side until the swing is level (we just put the level on the seat and moved it up and down until it was level).

10. This arrangement worked, but left the seat quite high.

11. I went back over to Home Depot and got an extra foot of chain. Then using the connection link we adjusted the longer side down until level.

12. Sit and enjoy!


Leave a comment

The Bluestone Landing is Done!


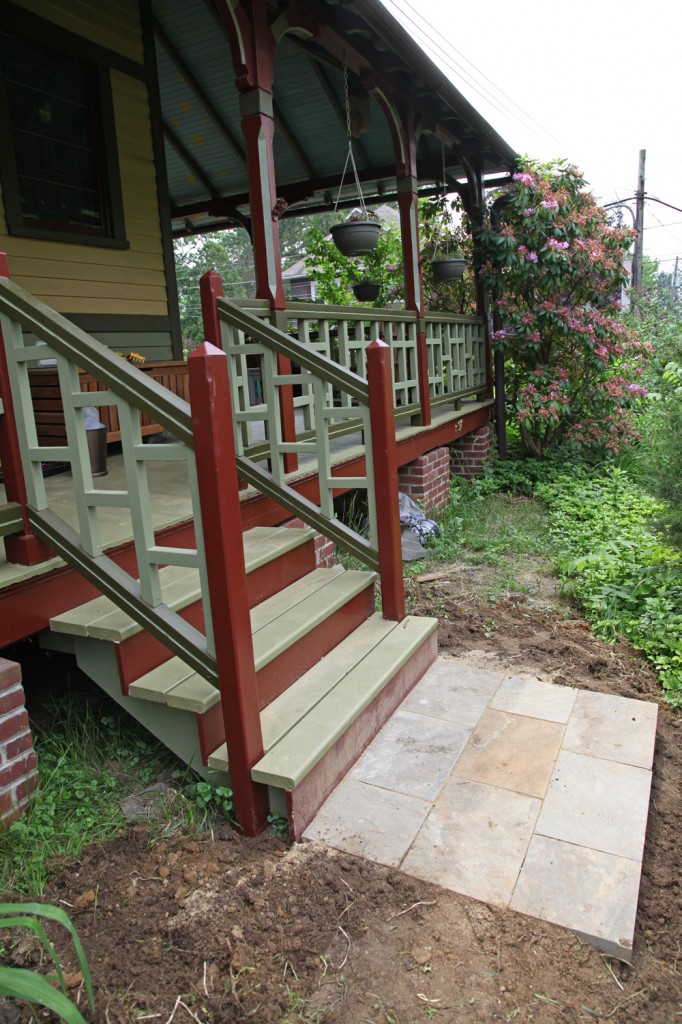
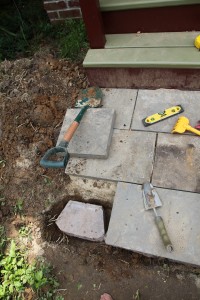
It may not look like much, but I managed to get the bluestone landing finished yesterday! I was determined to get this finished before this weekend. I hope everyone gets to enjoy the 3 day weekend!

It is hard to believe that it took us this long to put these stairs and landing in. This side yard has been wasted space for the past 110 years or so, and now it is a key part of the circulation path for the house. I still need to post a plan of the yard but I have been having trouble converting my autocad into an illustrator file. Hopefully next week I can post up the site plan so you can better understand the flow of the space.

I still need to work on the planting in this area as well. I also want to add a small raised veggie bed in the space just past the new landing (top right in the photo above). It is now a mix of weedy grass and pachysandra.

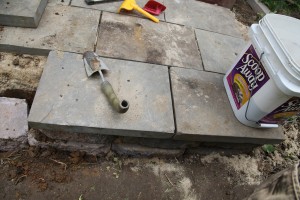
Laying the bluestone was tricker that I thought it would be.

The Install:

1. First I measured down from the wood steps (so that the bottom step to the landing would be the same height as the wood steps).

2. Then I had to account for the differing heights of the stone (they varied from 1 1/2″ to 2 1/4″ thick) to figure out how far down to dig.

3. Because I needed to add some retaining blocks (which are just the standard one from Home Depot, $2.18 a piece) under the sloped side to stabilize it I also needed to dig out for these. And because these would be at a set height I picked the 3 pieces of stone that were the closest in depth and used those on that side.

4. I dug out the dirt which was filled with annoying pachysandra roots. Including for 2 layers of retaining blocks.

5. Then I filled with sand (about 3″ thick) starting at the stairs to make sure the height was correct.

6. I sloped the stones about 1/4″ per foot towards the slope for drainage.

7. After I laid the first row (which took the longest to get just right), I started with the second row. and aligned with the first row while maintaining the slope in 1 direction and level in the other.

8. The third row required getting the 2 layers of retaining blocks at the right height and slope. This took lots of putting them in and out until they were just right.

9. I filled around the retaining blocks and installed the last 3 pieces on top.

10. Finally I filled the joints with sand and pushed it in with a broom.

11. I still need to take a hose to it and try to get some more stand into the joints.

The retaining blocks under the landing

Installing the last retaining block & blueston paver

1 Comment

Back in 2005 (before we started the kitchen renovation)

If you look closely you can see that there was some kind of built-in previously installed on this wall. Although the base molding was still original.

View from the kitchen (when it was the dining room)


Our half bath was originally an awkward closet under the front stairs. We used it for coats and storage but it wasn’t as useful as it could be. So we decided that it would be best used as a half bath (reluctantly loosing the only closet on the first floor). Back in 2005 (before we started the kitchen renovation) we decided to take the wall down between the closet/future half bath and the hallway (so that we could close off the door to the future kitchen). The space sat like this for 2 years (while we redid the kitchen, dining room, back desk and had a baby). The half bath wasn’t a priority until after the arrival of our son and we started to have more visitors to our house (and the idea of a second toilet started to become an issue). We gave ourselves the deadline of Thanksgiving and put ourselves to work.

The back of the drywall from the kitchen

New studs for the back wall and storage shelf

New 2x3 studs for the wall/paneling.


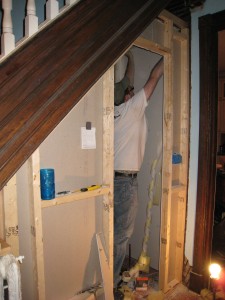
We had already done most of the demo. First we needed to carefully remove the baseboard (for cutting and reinstallation). Then we decided to take out the old studs (which were a non-standard size and not very plumb) and replace them with 2x3s. We were very tight on space and had to make the new paneling fit behind the original location of the baseboard (by using 1/2″ plywood and 3/4″ deep trim). We also wanted to fit a mirror we already had which was a very tight fit.
Also we needed to access the space below the stairs to install a new duct for the dryer below (and add some insulation for good measure). Then we had the pluming roughed in so we could decide where the wall between the dead space and the half bath would go. In the end that wall moved back about 10″ to allow for the toilet waste pipe to sit in between 2 floor joists and give us enough floor space in front.

Mr S. Installing the drywall

The dark gap shows the difference between the old wall and new wall behind the toilet.

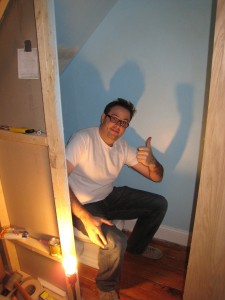
Mr S. testing out the toilet.


Next we installed the drywall to the inside, spackled and painted. Then we had the plumber come and hook everything up. We used an extra tiny sink (15″x11″) and a round bowled kohler memoirs toilet. When looking for toilets in a small space make sure to check the total depth (the memoirs is about 28 1/2″ deep).

Wall before paneling

Wall after the wood veneer plywood back was installed.

Wall as we are starting to construct the door.

Door installed (staining not complete)

Finally came the new wood paneling and door. I had the lumberyard rip down some oak veneer plywood to the proper widths. Then I cut them to the right lengths with a jigsaw (the edges were going to get covered with trim so I didnt’ need to be too precise). Then I stained them outside and installed. Next I installed the vertical and horizontal trim (with a chamfer reveal). I worked out the pattern ahead of time to make equal widths that would work with the door opening. Finally we constructed the door out of the same plywood and thicker wood pieces and installed matching trim on the front. The door is not quite as sturdy as I would like. One of these days I will get around to reinforcing it some more. We did manage to finish it on Thanksgiving morning (just in time).

Take a look at yesterday’s post to see how the inside came out. You will also see that I still haven’t patched the plaster in between this wall and the kitchen doorway. Hmmm….one more thing to add to the list.

Finished Door (looking from Kitchen)

Finished door looking from front door.

3 Comments